0%

最常见的退出代码,它们的含义以及导致它们的原因

Docker容器退出代码-如何使用它们进行故障排除?

这是我遇到的最常见的问题之一:“为什么我的容器没有运行?”

码头集装箱出口代码可以帮助解决此问题吗?

回答此问题的第一步是识别Docker容器的退出代码。退出代码可以提示停止容器运行的情况。本文列出了使用Docker容器时最常见的退出代码,旨在回答两个重要问题:

  • 这个特定的退出代码是什么意思?
  • 导致此退出代码的动作是什么?

这最终将有助于回答最初的问题:“为什么我的容器没有运行?”

如何查找退出代码

选项1:列出所有退出的容器

1
docker ps --filter“状态=退出”

选项2:按容器名称进行的Grep

1
docker ps -a grep <容器名称>示例:docker ps -a | grep hello-world

选项3:按容器ID检查

1
码头工人检查<container-id> --format ='{{。State.ExitCode}}'示例:码头工人检查ca6cbb290468 --format ='{{。State.ExitCode}}'

退出码

与Docker容器关联的常见退出代码为:

  • 退出代码0:缺少附加的前台进程
  • 退出代码1:指示由于应用程序错误而导致的失败
  • 退出代码137:指示由于容器收到SIGKILL而失败(手动干预或“ oom-killer” [OUT-OF-MEMORY])
  • 退出代码139:指示由于收到容器SIGSEGV而失败
  • 退出代码143:指示由于收到容器而失败SIGTERM

退出码0

  • 退出代码0指示特定的容器没有附加的前台进程。
  • 此退出代码是所有其他后续退出代码的例外。这并不一定意味着发生了不好的事情。
  • 如果开发人员想要在容器完成其工作后自动停止其容器,则使用此退出代码。

这是一个使用公共docker容器的示例-“ hello-world”。如果在系统或VM实例上安装了docker,请运行以下命令:

1
docker运行hello-world

您将收到一条消息,“您好,码头工人!” 但尝试使用以下代码查找容器:

1
泊坞窗ps -a | grep hello-world

您会注意到该容器已退出,并且退出代码为0。这是因为该容器没有附加任何前台进程,例如Java进程或运行直到发生SIGTERM事件的Shell进程。

图片发布

图片发布

退出码0

退出代码1

  • 指示容器由于应用程序错误或Dockerfile中对容器中不存在的文件的错误引用而停止。
  • 应用程序错误可能很简单,例如“除以0”,也可能很复杂,例如“引用与相同名称和类的现有不兼容Bean定义冲突的Bean名称”。
  • Dockerfile中对容器中不存在的文件的错误引用可以像错字一样简单(下面的示例使用sample.ja代替sample.jar

图片发布

图片发布

退出代码1

退出代码137

  • 这表明容器收到了SIGKILL
  • 引发SIGKILL的常见事件是docker kill。这可以由用户或由docker守护程序手动启动:
1
码头工人杀死<container-id>
  • docker kill可以由用户或主机手动启动。如果由主机启动,则通常是由于内存不足。要确认容器是否由于内存不足而退出,请docker inspect针对以下部分的容器ID进行验证,并检查其是否OOMKilled为true(这表明容器内存不足):
1
2
3
4
5
6
7
8
9
10
11
12
13
“状态”:{ 
“状态”:“退出”,
“运行”:假,
“暂停”:假,
“重启”:假,
“ OOMKilled”:真,
“死”:假,
“ Pid”:0,
“ ExitCode“:137,
”错误“:”“,
” StartedAt“:” 2019-10-21T01:13:51.7340288Z“,
” FinishedAt“:” 2019-10-21T01:13:51.7961614Z“
}

退出代码139

  • 这表明该容器收到了SIGSEGV
  • SIGSEGV指示分段错误。当程序尝试访问不允许访问的存储位置或试图以不允许的方式访问存储位置时,会发生这种情况。
  • 从Docker容器的角度来看,这要么表明应用程序代码有问题,要么有时表明容器使用的基本映像有问题。

退出代码143

  • 这表明该容器收到了SIGTERM。
  • 发起SIGTERM的常见事件是docker stopdocker-compose stop。在这种情况下,有一个手动终止操作迫使容器退出:
1
2
3
docker stop <container-id>

docker-compose down <container-id>
  • 注意:有时docker stop还会导致退出代码137。通常,如果绑定到容器的应用程序无法处理SIGTERM,则通常会发生这种情况-docker守护程序等待十秒钟,然后发出SIGKILL

Docker容器的一些不常见的退出代码(通常使用shell脚本)

  • 退出代码126:权限问题或命令不可执行
  • 退出代码127:shell脚本中可能出现拼写错误且字符无法识别的情况

目录

  一、入门示例

  二、异常场景1

  三、异常场景2

  四、解决方法

之前在使用线程池的时候,出现了 java.util.concurrent.RejectedExecutionException ,原因是线程池配置不合理,导致提交的任务来不及处理。接下来用一个简单的例子来复现异常。

1
2
3
4
5
Exception in thread "main" java.util.concurrent.RejectedExecutionException: Task org.cellphone.common.pool.Worker@f6f4d33 rejected from java.util.concurrent.ThreadPoolExecutor@23fc625e[Running, pool size = 3, active threads = 3, queued tasks = 15, completed tasks = 0]
at java.util.concurrent.ThreadPoolExecutor$AbortPolicy.rejectedExecution(ThreadPoolExecutor.java:2047)
at java.util.concurrent.ThreadPoolExecutor.reject(ThreadPoolExecutor.java:823)
at java.util.concurrent.ThreadPoolExecutor.execute(ThreadPoolExecutor.java:1369)
at org.cellphone.common.pool.RejectedExecutionExceptionExample.main(RejectedExecutionExceptionExample.java:22)

一、入门示例

下面的测试程序使用 ThreadPoolExecutor 类来创建线程池执行任务,代表任务 Worker 类代码如下:

1
2
3
4
5
6
7
8
9
10
11
12
13
14
15
16
17
18
19
20
21
22
/**
* Created by on 2019/4/20.
*/
public class Worker implements Runnable {

private int id;

public Worker(int id) {
this.id = id;
}

@Override
public void run() {
try {
System.out.println(Thread.currentThread().getName() + " 执行任务 " + id);
Thread.sleep(1000);
System.out.println(Thread.currentThread().getName() + " 完成任务 " + id);
} catch (Exception e) {
e.printStackTrace();
}
}
}

执行 Worker 任务的代码如下:

1
2
3
4
5
6
7
8
9
10
11
12
13
14
15
16
17
18
19
20
21
22
23
24
25
import java.util.concurrent.ArrayBlockingQueue;
import java.util.concurrent.ExecutorService;
import java.util.concurrent.ThreadPoolExecutor;
import java.util.concurrent.TimeUnit;

/**
* Created by on 2019/4/20.
*/
public class RejectedExecutionExceptionExample {

public static void main(String[] args) {

ExecutorService executor = new ThreadPoolExecutor(3, 3, 0L,
TimeUnit.MILLISECONDS, new ArrayBlockingQueue<>(15));

Worker tasks[] = new Worker[10];
for (int i = 0; i < 10; i++) {
tasks[i] = new Worker(i);
System.out.println("提交任务: " + tasks[i] + ", " + i);
executor.execute(tasks[i]);
}
System.out.println("主线程结束");
executor.shutdown(); // 关闭线程池
}
}

运行一下,看到如下输出:

1
2
3
4
5
6
7
8
9
10
11
12
13
14
15
16
17
18
19
20
21
22
23
24
25
26
27
28
29
30
31
提交任务: org.cellphone.common.pool.Worker@36baf30c, 0
提交任务: org.cellphone.common.pool.Worker@5ca881b5, 1
提交任务: org.cellphone.common.pool.Worker@4517d9a3, 2
提交任务: org.cellphone.common.pool.Worker@2f92e0f4, 3
提交任务: org.cellphone.common.pool.Worker@28a418fc, 4
提交任务: org.cellphone.common.pool.Worker@5305068a, 5
提交任务: org.cellphone.common.pool.Worker@1f32e575, 6
提交任务: org.cellphone.common.pool.Worker@279f2327, 7
提交任务: org.cellphone.common.pool.Worker@2ff4acd0, 8
提交任务: org.cellphone.common.pool.Worker@54bedef2, 9
主线程结束
pool-1-thread-1 执行任务 0
pool-1-thread-2 执行任务 1
pool-1-thread-3 执行任务 2
pool-1-thread-1 完成任务 0
pool-1-thread-1 执行任务 3
pool-1-thread-2 完成任务 1
pool-1-thread-2 执行任务 4
pool-1-thread-3 完成任务 2
pool-1-thread-3 执行任务 5
pool-1-thread-2 完成任务 4
pool-1-thread-2 执行任务 6
pool-1-thread-3 完成任务 5
pool-1-thread-1 完成任务 3
pool-1-thread-3 执行任务 7
pool-1-thread-1 执行任务 8
pool-1-thread-3 完成任务 7
pool-1-thread-2 完成任务 6
pool-1-thread-1 完成任务 8
pool-1-thread-2 执行任务 9
pool-1-thread-2 完成任务 9

在 RejectedExecutionExceptionExample 类里,我们使用 ThreadPoolExecutor 类创建了一个数量为3的线程池来执行任务,在这3个线程执行任务被占用期间,如果有新任务提交给线程池,那么这些新任务会被保存在 BlockingQueue 阻塞队列里,以等待被空闲线程取出并执行。在这里我们使用一个大小为15的 ArrayBlockingQueue 队列来保存待执行的任务,然后我们创建了10个任务提交给 ThreadPoolExecutor 线程池。

二、异常场景1

产生 RejectedExecutionException 异常的第一个原因:

调用 shutdown() 方法关闭了 ThreadPoolExecutor 线程池,又提交新任务给 ThreadPoolExecutor 线程池执行。一般调用 shutdown() 方法之后,JVM会得到一个关闭线程池的信号,并不会立即关闭线程池,原来线程池里未执行完的任务仍然在执行,等到任务都执行完后才关闭线程池,但是JVM不允许再提交新任务给线程池。

让我们用以下例子来重现该异常:

1
2
3
4
5
6
7
8
9
10
11
12
13
14
15
16
17
18
19
20
21
22
23
24
25
26
import java.util.concurrent.ArrayBlockingQueue;
import java.util.concurrent.ExecutorService;
import java.util.concurrent.ThreadPoolExecutor;
import java.util.concurrent.TimeUnit;

/**
* Created by on 2019/4/20.
*/
public class RejectedExecutionExceptionExample {

public static void main(String[] args) {

ExecutorService executor = new ThreadPoolExecutor(3, 3, 0L,
TimeUnit.MILLISECONDS, new ArrayBlockingQueue<>(15));

Worker tasks[] = new Worker[10];
for (int i = 0; i < 10; i++) {
tasks[i] = new Worker(i);
System.out.println("提交任务: " + tasks[i] + ", " + i);
executor.execute(tasks[i]);
}
System.out.println("主线程结束");
executor.shutdown();// 关闭线程池
executor.execute(tasks[0]);// 关闭线程池之后提交新任务,运行之后抛异常
}
}

运行一下,看到如下输出:

1
2
3
4
5
6
7
8
9
10
11
12
13
14
15
16
17
18
19
20
21
22
23
24
25
26
27
28
29
30
31
32
33
34
35
36
提交任务: org.cellphone.common.pool.Worker@36baf30c, 0
提交任务: org.cellphone.common.pool.Worker@5ca881b5, 1
提交任务: org.cellphone.common.pool.Worker@4517d9a3, 2
提交任务: org.cellphone.common.pool.Worker@2f92e0f4, 3
提交任务: org.cellphone.common.pool.Worker@28a418fc, 4
提交任务: org.cellphone.common.pool.Worker@5305068a, 5
提交任务: org.cellphone.common.pool.Worker@1f32e575, 6
提交任务: org.cellphone.common.pool.Worker@279f2327, 7
提交任务: org.cellphone.common.pool.Worker@2ff4acd0, 8
提交任务: org.cellphone.common.pool.Worker@54bedef2, 9
主线程结束
Exception in thread "main" java.util.concurrent.RejectedExecutionException: Task org.cellphone.common.pool.Worker@36baf30c rejected from java.util.concurrent.ThreadPoolExecutor@5caf905d[Shutting down, pool size = 3, active threads = 3, queued tasks = 7, completed tasks = 0]
at java.util.concurrent.ThreadPoolExecutor$AbortPolicy.rejectedExecution(ThreadPoolExecutor.java:2047)
at java.util.concurrent.ThreadPoolExecutor.reject(ThreadPoolExecutor.java:823)
at java.util.concurrent.ThreadPoolExecutor.execute(ThreadPoolExecutor.java:1369)
at org.cellphone.common.pool.RejectedExecutionExceptionExample.main(RejectedExecutionExceptionExample.java:26)
pool-1-thread-1 执行任务 0
pool-1-thread-2 执行任务 1
pool-1-thread-3 执行任务 2
pool-1-thread-1 完成任务 0
pool-1-thread-1 执行任务 3
pool-1-thread-2 完成任务 1
pool-1-thread-2 执行任务 4
pool-1-thread-3 完成任务 2
pool-1-thread-3 执行任务 5
pool-1-thread-3 完成任务 5
pool-1-thread-3 执行任务 6
pool-1-thread-2 完成任务 4
pool-1-thread-2 执行任务 7
pool-1-thread-1 完成任务 3
pool-1-thread-1 执行任务 8
pool-1-thread-3 完成任务 6
pool-1-thread-2 完成任务 7
pool-1-thread-3 执行任务 9
pool-1-thread-1 完成任务 8
pool-1-thread-3 完成任务 9

从以上例子可以看出,在调用 shutdown() 方法之后,由于JVM不允许再提交新任务给线程池,于是抛出了 RejectedExecutionException 异常。

三、异常场景2

产生 RejectedExecutionException 异常第二个原因:

要提交给阻塞队列的任务超出了该队列的最大容量。当线程池里的线程都繁忙的时候,新任务会被提交给阻塞队列保存,这个阻塞队列一旦饱和,线程池就会拒绝接收新任务,随即抛出异常。

示例代码如下:

1
2
3
4
5
6
7
8
9
10
11
12
13
14
15
16
17
18
19
20
21
22
23
24
25
26
import java.util.concurrent.ArrayBlockingQueue;
import java.util.concurrent.ExecutorService;
import java.util.concurrent.ThreadPoolExecutor;
import java.util.concurrent.TimeUnit;

/**
* Created by on 2019/4/20.
*/
public class RejectedExecutionExceptionExample {

public static void main(String[] args) {

ExecutorService executor = new ThreadPoolExecutor(3, 3, 0L,
TimeUnit.MILLISECONDS, new ArrayBlockingQueue<>(15));

// 提交20个任务给线程池
Worker tasks[] = new Worker[20];
for (int i = 0; i < 20; i++) {
tasks[i] = new Worker(i);
System.out.println("提交任务: " + tasks[i] + ", " + i);
executor.execute(tasks[i]);
}
System.out.println("主线程结束");
executor.shutdown();// 关闭线程池
}
}

在上面的例子中,我们使用了一个大小为15的 ArrayBlockingQueue 阻塞队列来保存等待执行的任务。接着我们提交了20个任务给线程池,由于每个线程执行任务的时候会睡眠1秒,因此当3个线程繁忙的时候,其他任务不会立即得到执行,我们提交的新任务会被保存在队列里。当等待任务的数量超过线程池阻塞队列的最大容量时,抛出了 RejectedExecutionException 异常。

四、解决方法

要解决 RejectedExecutionException 异常,首先我们要注意两种情况:

  1. 当调用了线程池的shutdown()方法以后,不要提交新任务给线程池
  2. 不要提交大量超过线程池处理能力的任务,这时可能会导致队列饱和,抛出异常

对于第二种情况,我们很容易解决。我们可以选择一种不需要设置大小限制的数据结构,比如 LinkedBlockingQueue 阻塞队列。因此在使用 LinkedBlockingQueue 队列以后,如果还出现 RejectedExecutionException 异常,就要将问题的重点放在第一种情况上。如果第一种情况不是产生问题的原因,那么我们还需要寻找更复杂的原因。比如,由于线程死锁和 LinkedBlockingQueue 饱和,导致内存占用过大,这个时候我们就需要考虑JVM可用内存的问题了。

对于第二种情况,通常有一些隐藏的信息被我们忽略。其实我们可以给使用 ArrayBlockingQueue 作为阻塞队列的 ThreadPoolExecutor 线程池提交超过15个的任务,只要我们在提交新任务前设置一个完成原来任务的等待时间,这时3个线程就会逐渐消费 ArrayBlockingQueue 阻塞队列里的任务,而不会使它堵塞。示例如下:

1
2
3
4
5
6
7
8
9
10
11
12
13
14
15
16
17
18
19
20
21
22
23
24
25
26
27
28
29
30
31
32
33
34
import java.util.concurrent.ArrayBlockingQueue;
import java.util.concurrent.ExecutorService;
import java.util.concurrent.ThreadPoolExecutor;
import java.util.concurrent.TimeUnit;

/**
* Created by on 2019/4/20.
*/
public class RejectedExecutionExceptionExample {

public static void main(String[] args) throws InterruptedException {

ExecutorService executor = new ThreadPoolExecutor(3, 3, 0L,
TimeUnit.MILLISECONDS, new ArrayBlockingQueue<>(15));

// 提交20个任务给线程池
Worker tasks[] = new Worker[20];
for (int i = 0; i < 10; i++) {
tasks[i] = new Worker(i);
System.out.println("提交任务: " + tasks[i] + ", " + i);
executor.execute(tasks[i]);
}

Thread.sleep(3000);// 让主线程睡眠三秒
for (int i = 10; i < 20; i++) {
tasks[i] = new Worker(i);
System.out.println("提交任务: " + tasks[i] + ", " + i);
executor.execute(tasks[i]);
}

System.out.println("主线程结束");
executor.shutdown();// 关闭线程池
}
}

运行一下,看到如下输出:

1
2
3
4
5
6
7
8
9
10
11
12
13
14
15
16
17
18
19
20
21
22
23
24
25
26
27
28
29
30
31
32
33
34
35
36
37
38
39
40
41
42
43
44
45
46
47
48
49
50
51
52
53
54
55
56
57
58
59
60
61
提交任务: org.cellphone.common.pool.Worker@36baf30c, 0
提交任务: org.cellphone.common.pool.Worker@5ca881b5, 1
提交任务: org.cellphone.common.pool.Worker@4517d9a3, 2
提交任务: org.cellphone.common.pool.Worker@2f92e0f4, 3
提交任务: org.cellphone.common.pool.Worker@28a418fc, 4
提交任务: org.cellphone.common.pool.Worker@5305068a, 5
提交任务: org.cellphone.common.pool.Worker@1f32e575, 6
提交任务: org.cellphone.common.pool.Worker@279f2327, 7
提交任务: org.cellphone.common.pool.Worker@2ff4acd0, 8
提交任务: org.cellphone.common.pool.Worker@54bedef2, 9
pool-1-thread-1 执行任务 0
pool-1-thread-2 执行任务 1
pool-1-thread-3 执行任务 2
pool-1-thread-2 完成任务 1
pool-1-thread-3 完成任务 2
pool-1-thread-1 完成任务 0
pool-1-thread-3 执行任务 4
pool-1-thread-2 执行任务 3
pool-1-thread-1 执行任务 5
pool-1-thread-3 完成任务 4
pool-1-thread-3 执行任务 6
pool-1-thread-2 完成任务 3
pool-1-thread-2 执行任务 7
pool-1-thread-1 完成任务 5
pool-1-thread-1 执行任务 8
提交任务: org.cellphone.common.pool.Worker@5caf905d, 10
提交任务: org.cellphone.common.pool.Worker@27716f4, 11
提交任务: org.cellphone.common.pool.Worker@8efb846, 12
提交任务: org.cellphone.common.pool.Worker@2a84aee7, 13
提交任务: org.cellphone.common.pool.Worker@a09ee92, 14
提交任务: org.cellphone.common.pool.Worker@30f39991, 15
提交任务: org.cellphone.common.pool.Worker@452b3a41, 16
提交任务: org.cellphone.common.pool.Worker@4a574795, 17
提交任务: org.cellphone.common.pool.Worker@f6f4d33, 18
pool-1-thread-3 完成任务 6
pool-1-thread-2 完成任务 7
pool-1-thread-1 完成任务 8
pool-1-thread-2 执行任务 10
pool-1-thread-3 执行任务 9
提交任务: org.cellphone.common.pool.Worker@23fc625e, 19
pool-1-thread-1 执行任务 11
主线程结束
pool-1-thread-2 完成任务 10
pool-1-thread-2 执行任务 12
pool-1-thread-1 完成任务 11
pool-1-thread-1 执行任务 13
pool-1-thread-3 完成任务 9
pool-1-thread-3 执行任务 14
pool-1-thread-2 完成任务 12
pool-1-thread-2 执行任务 15
pool-1-thread-3 完成任务 14
pool-1-thread-3 执行任务 16
pool-1-thread-1 完成任务 13
pool-1-thread-1 执行任务 17
pool-1-thread-2 完成任务 15
pool-1-thread-2 执行任务 18
pool-1-thread-3 完成任务 16
pool-1-thread-1 完成任务 17
pool-1-thread-3 执行任务 19
pool-1-thread-2 完成任务 18
pool-1-thread-3 完成任务 19

当然上面这种设置等待时间来分隔旧任务和新任务的方式,在高并发情况下效率并不高,一方面由于我们无法准确预估等待时间,一方面由于 ArrayBlockingQueue 内部只使用了一个锁来隔离读和写的操作,因此效率没有使用了两个锁来隔离读写操作的 LinkedBlockingQueue 高,故而不推荐使用这种方式。

还在为大厂app抓不到包而犯愁吗?

抓不到请求的现象

我们经常在wifi设置中 设置代理到我们的pc http代理软件上,多数情况下,此时我们开启的app流量都可以在代理软件上看到,比如charles , fiddler等等。 但是细心的人会发现 某些大厂的app 某些请求 在这些 http代理软件上就是抓不到, 给人的感觉就是 流量没从代理软件走一样。

抓不到请求的原因

大家都知道 http协议下层是tcp协议,tcp协议都是内置在操作系统里面的,我们最多只能使用tcp协议对外暴露的socket接口来进行编程, 我们是无法修改操作系统本身的tcp协议的实现的。

但是http协议不同,http协议 都是各个开发者自己实现的, 换句话说 你要实现什么样的http客户端,这个客户端对http协议实现的好坏,实现了多少,支持哪些细节都是你自己决定的。 比如说android上 最有名的okhttp 就是一个http客户端的实现。

既然是自己实现,那就有说法了,虽然你系统设置了代理,但是我完全可以不使用你的代理(或者说我压根就没实现http协议中 proxy的部分)。 这样自然就会像大厂中的某些app一样, 你虽然设置了代理 但是你还是无法抓包。

因为人家http协议的客户端** 压根就没有使用你系统设置的 代理**。

看源码

想明白这个,我们再带着目的 去看源码 就很简单了。

首先okhttp 是肯定有实现http代理的部分的,否则我们每天也不可能使用代理 愉快的进行抓包。 那么既然有大厂的app 抓不到,那么肯定是某些属性 动态设置了。

注意看下面的代码:

img

如果我这样设置了,你就会发现 你的app的接口 也会抓不到了。

继续看源码: img

注释说的很明白,大概意思就是当你设置了这个属性以后,我们就不会使用系统代理了。 img

其实flutter也是有类似的功能,只不过okhttp 默认情况下是使用系统代理的,你要不想使用 你就必须写额外的代码,但是flutter是反过来的, flutter是默认就不使用系统代理,你要开启代理,必须在代码中进行设置:

1
2
3
4
5
6
7
8
9
10
11
12
13
14
15
16
17
18
19
20
21
22
23
lass ProxyDio {
//填入你的代理地址
static const _PROXY_IP_ADDRESS = "10.12.65.66";
//填入你的代理端口号
static const _PROXY_PORT_NUM = "5000";

static Dio getProxyDio() {
var dio = Dio();
final adapter = dio.httpClientAdapter as DefaultHttpClientAdapter;
adapter.onHttpClientCreate = (client) {
// 设置该客户端的代理为指定的 ip:端口
client.findProxy = (uri) {
// localProxyIPAddress 和 localProxyPort 是在外部被忽略文件中定义, 方便各个开发者自行更改.
return "PROXY " + _PROXY_IP_ADDRESS + ":" + _PROXY_PORT_NUM;
};
// 安卓机上面证书授权:
client.badCertificateCallback = (cert, host, port) => true;
};
return dio;
}
}

复制代码

特殊定制

了解到 事情的来龙去脉以后,我们还需要思考1个问题,为什么大厂的app 是有些接口抓不到,有些接口 就能抓到呢? 这里其实有3个原因。

第一: webview webview 使用的http协议 显然跟我们的okhttp是不一样的。而webview使用的 http协议栈 默认都是c代码的实现,我们很难干预,从测试的情况来看,这个http协议栈的实现 是会使用默认系统代理的。 我暂时没找到 关闭这个功能的api,如果有小伙伴实现了 可以告诉我

第二:可以针对性的对某些敏感接口 使用no_proxy,而其余接口保持正常。

实际上okhttp做的非常强大,对于代理的设置 他可以做到针对 接口地址不同 而 使用不一样的设置。

比如这种写法 和上面的no_proxy 就是差不多效果的 img

再看看 img

第三: 即使你使用了全局的no_proxy 代理,但是通常 我们的app里面都不会只有一个okhttp的 client,因为还有其他第三方的库引进来,他们的client 如果没有使用 no_proxy 那他们的接口 还是可以被抓包软件抓到的。

当然这个问题也是可以解决的,我们只要利用 字节码修改技术 直接修改 字节码即可。 这里就不多介绍了,有兴趣的可以自己实现。

使用了no_proxy 真的就抓不到了吗?

当然不是,解决问题的方法就很多,最简单的就是使用drony这个软件,模拟一个vpn网络 即可。 原理很简单,让流量走到vpn里面, 然后vpn默认使用代理 即可。

Pure-FTPd 是免费的FTP服务器,提供了一个轻量级、快速、多语言、具备基本功能特性的FTPServer配置方案,重点关注软件安全性。本文介绍如何在CentOS中安装与使用Pure-FTPd。

1.安装Pure-FTPd

1
yum -y install pure-ftpd

2.配置Pure-FTPd

1
vim /etc/pure-ftpd/pure-ftpd.conf

根据以下内容修改:

1
2
3
4
5
6
7
8
9
10
11
12
13
14
15
16
17
18
19
20
21
22
23
24
25
26
27
28
29
30
ChrootEveryone               yes
BrokenClientsCompatibility no
MaxClientsNumber 50
Daemonize yes
MaxClientsPerIP 8
VerboseLog no
DisplayDotFiles yes
AnonymousOnly no
NoAnonymous no
SyslogFacility ftp
DontResolve yes
MaxIdleTime 15
PureDB /etc/pure-ftpd/pureftpd.pdb
PAMAuthentication yes
LimitRecursion 10000 8
AnonymousCanCreateDirs no
MaxLoad 4
AntiWarez yes
Umask 133:022
MinUID 1000
AllowUserFXP no
AllowAnonymousFXP no
ProhibitDotFilesWrite no
ProhibitDotFilesRead no
AutoRename no
AnonymousCantUpload yes
AltLog clf:/var/log/pureftpd.log
PIDFile /var/run/pure-ftpd.pid
MaxDiskUsage 99
CustomerProof yes

3.新增系统用户

1
2
groupadd www
useradd -g www www

创建FTP的根目录,并赋予权限

1
2
mdkir -p /data/wwwroot
chown www:www -R /data/wwwroot

4.虚拟用户管理

4.1 创建虚拟用户

1
pure-pw useradd wwwuser -u www -g www -d /data/wwwroot

创建FTP用户wwwuser, 将该虚拟用户关联到系统用户的www和www用户组,指定FTP的根目录为/data/wwwroot,按下回车,输入密码即可创建。
创建完虚拟FTP用户后,需要重新生成用户数据库文件:

1
pure-pw mkdb

4.2 查看虚拟用户

1
2
3
pure-pw list  # 查看用户列表

pure-pw show wwwuser # 查看wwwuser用户

4.2 修改虚拟用户信息

1
2
pure-pw passwd wwwuser   #修改密码
pure-pw usermod wwwuser -d /data/wwwroot1 # 修改根目录

4.4 删除虚拟用户

1
pure-pw userdel wwwuser

1. Introduction

The API of Optional typically has two methods that can cause confusion: orElse() and orElseGet().

In this quick tutorial, we’ll look at the difference between those two and explore when to use each one.

2. Signatures

Let’s first start with the basics by looking at their signatures:

1
2
3
public T orElse(T other)

public T orElseGet(Supplier<? extends T> other)

Clearly, orElse() takes any parameter of a type T whereas orElseGet() accepts a functional interface of type Supplier that returns an object of type T.

Now, based on their Javadocs:

  • orElse(): returns the value if present, otherwise return other
  • orElseGet(): returns the value if present, otherwise invoke other and return the result of its invocation

3. Differences

It’s easy to be a bit confused by this simplified definitions, so let’s dig a little deeper and look at some actual usage scenarios.

3.1. orElse()

Assuming we have our logger configured properly, let’s start with writing a simple piece of code:

1
2
String name = Optional.of("baeldung")
.orElse(getRandomName());

Notice that getRandomName() is a method which returns a random name from a *List*of names:

1
2
3
4
5
6
7
8
9
public String getRandomName() {
LOG.info("getRandomName() method - start");

Random random = new Random();
int index = random.nextInt(5);

LOG.info("getRandomName() method - end");
return names.get(index);
}

On executing our code, we’ll find below messages printed in the console:

1
2
getRandomName() method - start
getRandomName() method - end

The variable name will hold “baeldung” at the end of the code execution.

With it, we can easily infer that the parameter of *orElse()* is evaluated even when having a non-empty *Optional*.

3.2. orElseGet()

Now, let’s try writing similar code using orElseGet():

1
2
String name = Optional.of("baeldung")
.orElseGet(() -> getRandomName());

The above code will not invoke getRandomName() method.

Remember (from the Javadoc) that the S*upplier* method passed as an argument is only executed when *an Optional* value is not present.

Using orElseGet() for our case will, therefore, save us some time involved in computing a random name.

4. Measuring Performance Impact

Now, to also understand the differences in performance, let’s use JMH and see some actual numbers:

1
2
3
4
5
@Benchmark
@BenchmarkMode(Mode.AverageTime)
public String orElseBenchmark() {
return Optional.of("baeldung").orElse(getRandomName());
}

And orElseGet():

1
2
3
4
5
@Benchmark
@BenchmarkMode(Mode.AverageTime)
public String orElseGetBenchmark() {
return Optional.of("baeldung").orElseGet(() -> getRandomName());
}

While executing our benchmark methods, we get:

1
2
3
Benchmark           Mode  Cnt      Score       Error  Units
orElseBenchmark avgt 20 60934.425 ± 15115.599 ns/op
orElseGetBenchmark avgt 20 3.798 ± 0.030 ns/op

As we can see, the performance impact might be substantial even for such a simple use-case scenario.

The numbers above might slightly vary, however, *orElseGet()* has clearly outperformed *orElse()* for our particular example.

Afterall, orElse() involves computation of getRandomName() method for each run.

5. What’s Important?

Apart from the performance aspects, other worth-considering factors involve:

  • What if the method would execute some additional logic? E.g. making some DB inserts or updates

  • Even when we assign an object to

    orElse()

    parameter:

    1
    String name = Optional.of("baeldung").orElse("Other")

    we’re still creating “Other” object for no reason

And that’s why it is important for us to make a careful decision among orElse() and orElseGet() depending on our needs – by default, it makes more sense to use *orElseGet()* every time unless the default object is already constructed and accessible directly.

推荐一款方便、实用的IDEA插件EasyApi

在我们开发http请求接口时,开发完成需要进行本地自测,在postman中一个一个输入接口地址,在输入请求参数,尤其是在请求参数较多的情况下,很费劲,尤其是post请求还需要json格式的数据,此时该插件的效果就体现出来了,可以将请求地址以及请求参数导出至postman

EasyApi插件

博主是基于mac下的IDEA开发的

1、安装插件
在这里插入图片描述

具体安装方法就不在介绍了,安装后为了使插件生效,别忘了对IDEA进行重启哦

2、然后进行导出,找到我们需要导出的Controller,选中后点击(control+回车)

在这里插入图片描述

执行后会发现出现以下错误,别慌这是配有配置token导致的
在这里插入图片描述

3、获取token,这里的token是登录postman软件的用户的token
链接:https://web.postman.co/settings/me/api-keys
在这里插入图片描述

4、IDEA中添加对应token
在这里插入图片描述

然后在进行导出,在postman中查看就会发现响应的请求地址和参数均已导出

在这里插入图片描述

RestfulToolkit插件

快速搜索http请求接口路径的插件

mac下快捷键(command+\)
效果图如下:
在这里插入图片描述

深入理解Redis的scan命令

熟悉Redis的人都知道,它是单线程的。因此在使用一些时间复杂度为O(N)的命令时要非常谨慎。可能一不小心就会阻塞进程,导致Redis出现卡顿。

有时,我们需要针对符合条件的一部分命令进行操作,比如删除以test_开头的key。那么怎么获取到这些key呢?在Redis2.8版本之前,我们可以使用keys命令按照正则匹配得到我们需要的key。但是这个命令有两个缺点:

  1. 没有limit,我们只能一次性获取所有符合条件的key,如果结果有上百万条,那么等待你的就是“无穷无尽”的字符串输出。
  2. keys命令是遍历算法,时间复杂度是O(N)。如我们刚才所说,这个命令非常容易导致Redis服务卡顿。因此,我们要尽量避免在生产环境使用该命令。

在满足需求和存在造成Redis卡顿之间究竟要如何选择呢?面对这个两难的抉择,Redis在2.8版本给我们提供了解决办法——scan命令。

相比于keys命令,scan命令有两个比较明显的优势:

  1. scan命令的时间复杂度虽然也是O(N),但它是分次进行的,不会阻塞线程。
  2. scan命令提供了limit参数,可以控制每次返回结果的最大条数。

这两个优势就帮助我们解决了上面的难题,不过scan命令也并不是完美的,它返回的结果有可能重复,因此需要客户端去重。至于为什么会重复,相信你看完本文之后就会有答案了。

关于scan命令的基本用法,可以参看Redis命令详解:Keys一文中关于SCAN命令的介绍。

今天我们主要从底层的结构和源码的角度来讨论scan是如何工作的。

Redis的结构

Redis使用了Hash表作为底层实现,原因不外乎高效且实现简单。说到Hash表,很多Java程序员第一反应就是HashMap。没错,Redis底层key的存储结构就是类似于HashMap那样数组+链表的结构。其中第一维的数组大小为2n(n>=0)。每次扩容数组长度扩大一倍。

scan命令就是对这个一维数组进行遍历。每次返回的游标值也都是这个数组的索引。limit参数表示遍历多少个数组的元素,将这些元素下挂接的符合条件的结果都返回。因为每个元素下挂接的链表大小不同,所以每次返回的结果数量也就不同。

SCAN的遍历顺序

关于scan命令的遍历顺序,我们可以用一个小栗子来具体看一下。

1
2
3
4
5
6
7
8
9
10
11
12
13
14
15
16
17
127.0.0.1:6379> keys *
1) "db_number"
2) "key1"
3) "myKey"
127.0.0.1:6379> scan 0 MATCH * COUNT 1
1) "2"
2) 1) "db_number"
127.0.0.1:6379> scan 2 MATCH * COUNT 1
1) "1"
2) 1) "myKey"
127.0.0.1:6379> scan 1 MATCH * COUNT 1
1) "3"
2) 1) "key1"
127.0.0.1:6379> scan 3 MATCH * COUNT 1
1) "0"
2) (empty list or set)
复制代码

我们的Redis中有3个key,我们每次只遍历一个一维数组中的元素。如上所示,SCAN命令的遍历顺序是

0->2->1->3

这个顺序看起来有些奇怪。我们把它转换成二进制就好理解一些了。

00->10->01->11

我们发现每次这个序列是高位加1的。普通二进制的加法,是从右往左相加、进位。而这个序列是从左往右相加、进位的。这一点我们在redis的源码中也得到印证。

在dict.c文件的dictScan函数中对游标进行了如下处理

1
2
3
4
v = rev(v);
v++;
v = rev(v);
复制代码

意思是,将游标倒置,加一后,再倒置,也就是我们所说的“高位加1”的操作。

这里大家可能会有疑问了,为什么要使用这样的顺序进行遍历,而不是用正常的0、1、2……这样的顺序呢,这是因为需要考虑遍历时发生字典扩容与缩容的情况(不得不佩服开发者考虑问题的全面性)。

我们来看一下在SCAN遍历过程中,发生扩容时,遍历会如何进行。加入我们原始的数组有4个元素,也就是索引有两位,这时需要把它扩充成3位,并进行rehash。

rehash

原来挂接在xx下的所有元素被分配到0xx和1xx下。在上图中,当我们即将遍历10时,dict进行了rehash,这时,scan命令会从010开始遍历,而000和100(原00下挂接的元素)不会再被重复遍历。

再来看看缩容的情况。假设dict从3位缩容到2位,当即将遍历110时,dict发生了缩容,这时scan会遍历10。这时010下挂接的元素会被重复遍历,但010之前的元素都不会被重复遍历了。所以,缩容时还是可能会有些重复元素出现的。

Redis的rehash

rehash是一个比较复杂的过程,为了不阻塞Redis的进程,它采用了一种渐进式的rehash的机制。

1
2
3
4
5
6
7
8
9
10
11
12
13
14
15
/* 字典 */
typedef struct dict {
// 类型特定函数
dictType *type;
// 私有数据
void *privdata;
// 哈希表
dictht ht[2];
// rehash 索引
// 当 rehash 不在进行时,值为 -1
int rehashidx; /* rehashing not in progress if rehashidx == -1 */
// 目前正在运行的安全迭代器的数量
int iterators; /* number of iterators currently running */
} dict;
复制代码

在Redis的字典结构中,有两个hash表,一个新表,一个旧表。在rehash的过程中,redis将旧表中的元素逐步迁移到新表中,接下来我们看一下dict的rehash操作的源码。

1
2
3
4
5
6
7
8
9
10
11
12
13
14
15
16
17
18
19
20
21
22
23
24
25
26
27
28
29
30
31
32
33
34
35
36
37
38
39
40
41
42
43
44
45
46
47
48
49
50
51
52
53
54
/* Performs N steps of incremental rehashing. Returns 1 if there are still
* keys to move from the old to the new hash table, otherwise 0 is returned.
*
* Note that a rehashing step consists in moving a bucket (that may have more
* than one key as we use chaining) from the old to the new hash table, however
* since part of the hash table may be composed of empty spaces, it is not
* guaranteed that this function will rehash even a single bucket, since it
* will visit at max N*10 empty buckets in total, otherwise the amount of
* work it does would be unbound and the function may block for a long time. */
int dictRehash(dict *d, int n) {
int empty_visits = n*10; /* Max number of empty buckets to visit. */
if (!dictIsRehashing(d)) return 0;

while(n-- && d->ht[0].used != 0) {
dictEntry *de, *nextde;

/* Note that rehashidx can't overflow as we are sure there are more
* elements because ht[0].used != 0 */
assert(d->ht[0].size > (unsigned long)d->rehashidx);
while(d->ht[0].table[d->rehashidx] == NULL) {
d->rehashidx++;
if (--empty_visits == 0) return 1;
}
de = d->ht[0].table[d->rehashidx];
/* Move all the keys in this bucket from the old to the new hash HT */
while(de) {
uint64_t h;

nextde = de->next;
/* Get the index in the new hash table */
h = dictHashKey(d, de->key) & d->ht[1].sizemask;
de->next = d->ht[1].table[h];
d->ht[1].table[h] = de;
d->ht[0].used--;
d->ht[1].used++;
de = nextde;
}
d->ht[0].table[d->rehashidx] = NULL;
d->rehashidx++;
}

/* Check if we already rehashed the whole table... */
if (d->ht[0].used == 0) {
zfree(d->ht[0].table);
d->ht[0] = d->ht[1];
_dictReset(&d->ht[1]);
d->rehashidx = -1;
return 0;
}

/* More to rehash... */
return 1;
}
复制代码

通过注释我们就能了解到,rehash的过程是以bucket为基本单位进行迁移的。所谓的bucket其实就是我们前面所提到的一维数组的元素。每次迁移一个列表。下面来解释一下这段代码。

  • 首先判断一下是否在进行rehash,如果是,则继续进行;否则直接返回。
  • 接着就是分n步开始进行渐进式rehash。同时还判断是否还有剩余元素,以保证安全性。
  • 在进行rehash之前,首先判断要迁移的bucket是否越界。
  • 然后跳过空的bucket,这里有一个empty_visits变量,表示最大可访问的空bucket的数量,这一变量主要是为了保证不过多的阻塞Redis。
  • 接下来就是元素的迁移,将当前bucket的全部元素进行rehash,并且更新两张表中元素的数量。
  • 每次迁移完一个bucket,需要将旧表中的bucket指向NULL。
  • 最后判断一下是否全部迁移完成,如果是,则收回空间,重置rehash索引,否则告诉调用方,仍有数据未迁移。

由于Redis使用的是渐进式rehash机制,因此,scan命令在需要同时扫描新表和旧表,将结果返回客户端。

1.安装redis-cli

1
2
# redis命令安装 就可以获取redis-cli
yum install redis

2.dump 文件:rdb

1
2
# 需要使用从库防止影响线上服务
redis-cli -h host -p port -a password --rdb filename

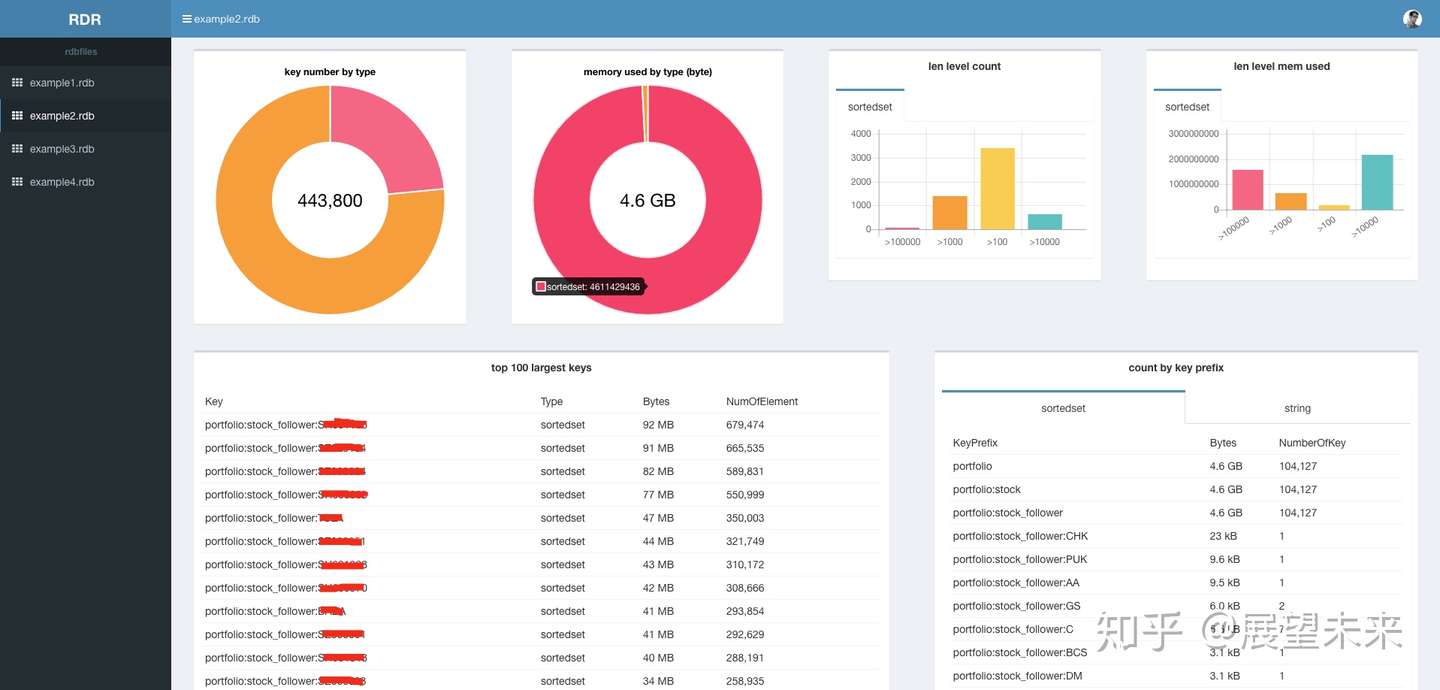
RDR 简介

RDR 是解析 redis rdbfile 工具。与redis-rdb-tools相比,RDR 是由golang 实现的,速度更快(5GB rdbfile 在我的PC上大约需要2分钟)。

例子

1
$ ./rdr show -p 8080 *.rdb

img

1
2
3
4
5
6
7
8
9
10
$ ./rdr keys example.rdb

portfolio:stock_follower_count:ZH314136
portfolio:stock_follower_count:ZH654106
portfolio:stock_follower:ZH617824
portfolio:stock_follower_count:ZH001019
portfolio:stock_follower_count:ZH346349
portfolio:stock_follower_count:ZH951803
portfolio:stock_follower:ZH924804
portfolio:stock_follower_count:INS104806

优势

  • 分析 Redis 内存中那个 Key 值占用的内存最多
  • 分析出 Redis 内存中那一类开头的 Key 占用最多,有利于内存优化
  • Redis Key 值以 Dashboard 展示,这样更直观

安装

  • Linux amd64
1
2
$ wget https://github.com/xueqiu/rdr/releases/download/v0.0.1/rdr-linux -O /usr/local/bin/rdr 
$ chmod +x /usr/local/bin/rdr
  • MacOS
1
2
$ curl https://github.com/xueqiu/rdr/releases/download/v0.0.1/rdr-darwin -o /usr/local/bin/rdr 
$ chmod +x /usr/local/bin/rdr
  • Windows
1
2
# 浏览器下载下面链接,在点击运行 
https://github.com/xueqiu/rdr/releases/download/v0.0.1/rdr-windows.exe

RDR 参数解释

  • show 网页显示 rdbfile 的统计信息
  • keys 从 rdbfile 获取所有 key
  • help 帮助
  • –version 显示版本信息
1
2
分析多个 Redis rdb
$ rdr keys FILE1 [FILE2] [FILE3]...

项目地址

PS

背景

​ Redis是基于内存的KV数据库,内存作为存储介质,关注其内存的使用情况是一个重要指标,解析其内部的存储信息是给出优化方法和维护的最基本要求。解析内存有二种方法:第一个是通过scan遍历所有key,针对每个key进行分析(memory usage);第二个是基于RDB文件进行所有key的分析(redis-rdb-tools)。本文将介绍如何使用rdbtools工具。

说明

rdbtools工具包括了3个可执行文件:

1
2
3
rdb  -- 解析整个rdb文件
redis-memory-for-key -- 解析server里的单个key
redis-profiler --解析rdb文件成html格式

rdb是rdbtools工具包其中之一的工具,也是解析dump.rdb文件的工具:分析内存并将数据导出到JSON,Rdbtools是Redis的dump.rdb文件的解析器,解析器生成类似于xml。rdbtools提供了以下实用程序:

  1. 生成所有数据库和键中数据的内存报告
  2. 将转储文件转换为JSON
  3. 使用标准差异工具比较两个转储文件

安装 rdbtools

前提条件:

  1. 安装 python-lzf :加快解析速度

    1
    pip install python-lzf
  2. 安装redis-py:可选,仅在运行测试用例时需要

PyPI安装(推荐)

1
pip install rdbtools python-lzf

源码安装

1
2
3
git clone https://github.com/sripathikrishnan/redis-rdb-tools
cd redis-rdb-tools
sudo python setup.py install

命令行用法示例

help:

**1,rdb –help:解析整个rdb文件
**

复制代码

1
2
3
4
5
6
7
8
9
10
11
12
13
14
15
16
17
18
19
20
21
22
23
24
25
26
27
28
29
30
31
32
33
34
35
36
37
38
39
40
41
42
43
44
45
46
47
48
usage: rdb [options] /path/to/dump.rdb

Example : rdb --command json -k "user.*" /var/redis/6379/dump.rdb

positional arguments:
-- 要处理的dump文件
dump_file RDB Dump file to process

optional arguments:
-- 帮助
-h, --help show this help message and exit
-- 要处理的命令,-c后的有效参数为:json, diff,justkeys, justkeyvals, memory,protocol
-c CMD, --command CMD
Command to execute. Valid commands are json, diff,
justkeys, justkeyvals, memory and protocol
-- 输出文件
-f FILE, --file FILE Output file
-- 数据库号,可以提供多个数据库。如果未指定,则包括所有数据库。
-n DBS, --db DBS Database Number. Multiple databases can be provided.
If not specified, all databases will be included.
-- 要导出的key。这可以是一个正则表达式
-k KEYS, --key KEYS Keys to export. This can be a regular expression
-- key不导出。这可以是一个正则表达式
-o NOT_KEYS, --not-key NOT_KEYS
Keys Not to export. This can be a regular expression
-- 解析的数据类型。可能的值为string,hash,set,sortedset,list。可以输入多种类型提供。如果未指定,则为所有数据类型
-t TYPES, --type TYPES
Data types to include. Possible values are string,
hash, set, sortedset, list. Multiple typees can be
provided. If not specified, all data types will be
returned
-- 将key的内存输出限制为大于或等此值(以字节为单位)
-b BYTES, --bytes BYTES
Limit memory output to keys greater to or equal to
this value (in bytes)
-- 将内存按大小输出前N个key
-l LARGEST, --largest LARGEST
Limit memory output to only the top N keys (by size)
-- 将字符串转义为编码:raw(默认),print,utf8或base64。
-e {raw,print,utf8,base64}, --escape {raw,print,utf8,base64}
Escape strings to encoding: raw (default), print,
utf8, or base64.
-- 使用command protocol参数,从所有键中删除到期的key
-x, --no-expire With protocol command, remove expiry from all keys
-- 使用command protocol参数,将N秒添加到key的到期时间
-a N, --amend-expire N
With protocol command, add N seconds to key expiry
time

复制代码

2,redis-memory-for-key –help:– 解析server里指定的单个key

复制代码

1
2
3
4
5
6
7
8
9
10
11
12
13
14
15
16
17
18
19
Usage: redis-memory-for-key [options] redis-key
Examples :
redis-memory-for-key user:13423
redis-memory-for-key -s localhost -p 6379 user:13423


Options:
-- 帮助
-h, --help show this help message and exit
-- 服务地址,默认127.0.0.1
-s HOST, --server=HOST
Redis Server hostname. Defaults to 127.0.0.1
-- 服务端口,默认6379
-p PORT, --port=PORT Redis Server port. Defaults to 6379
--服务密码
-a PASSWORD, --password=PASSWORD
Password to use when connecting to the server
-- 数据库号,默认0
-d DB, --db=DB Database number, defaults to 0

复制代码

**3,redis-profiler –help:
**

复制代码

1
2
3
4
5
6
7
8
9
10
11
12
13
Usage: redis-profiler [options] /path/to/dump.rdb

Example 1 : redis-profiler -k "user.*" -k "friends.*" -f memoryreport.html /var/redis/6379/dump.rdb
Example 2 : redis-profiler /var/redis/6379/dump.rdb

Options:
-- 帮助
-h, --help show this help message and exit
-- 输出
-f FILE, --file=FILE Output file
-- 组合在一起的键。 多个正则表达式
-k KEYS, --key=KEYS Keys that should be grouped together. Multiple regexes
can be provided

复制代码

每次运行以上工具时都需要指定一个命令,以指示对解析的RDB数据应执行的操作。 操作有:

转储的JSON:

复制代码

1
2
3
4
5
6
7
8
9
10
11
> rdb --command json /var/redis/6379/dump.rdb

[{
"user003":{"fname":"Ron","sname":"Bumquist"},
"lizards":["Bush anole","Jackson's chameleon","Komodo dragon","Ground agama","Bearded dragon"],
"user001":{"fname":"Raoul","sname":"Duke"},
"user002":{"fname":"Gonzo","sname":"Dr"},
"user_list":["user003","user002","user001"]},{
"baloon":{"helium":"birthdays","medical":"angioplasty","weather":"meteorology"},
"armadillo":["chacoan naked-tailed","giant","Andean hairy","nine-banded","pink fairy"],
"aroma":{"pungent":"vinegar","putrid":"rotten eggs","floral":"roses"}}]

复制代码

过滤解析:

正则表达式匹配key,并且仅打印键和值:

1
2
3
4
5
6
> rdb --command justkeyvals --key "user.*" /var/redis/6379/dump.rdb

user003 fname Ron,sname Bumquist,
user001 fname Raoul,sname Duke,
user002 fname Gonzo,sname Dr,
user_list user003,user002,user001

仅处理数据库2中hash类型的a开头的key:

1
2
3
4
> rdb -c json --db 2 --type hash --key "a.*" /var/redis/6379/dump.rdb

[{},{
"aroma":{"pungent":"vinegar","putrid":"rotten eggs","floral":"roses"}}]

dump文件转换为JSON:

输出是UTF-8编码的JSON。 默认情况下,回调尝试使用UTF-8解析RDB数据,并使用\U表示符转义非’ASCII可打印’字符,或使用\x转义非UTF-8可解析的字节。 尝试对RDB数据进行解码可能会导致二进制数据错误,可以通过使用–escape raw选项来避免这种情况。 另一种选择是使用-e base64进行二进制数据的Base64编码。

解析dump文件并在标准输出上打印JSON:

1
2
3
4
5
> rdb -c json /var/redis/6379/dump.rdb

[{
"Citat":["B\u00e4ttre sent \u00e4n aldrig","Bra karl reder sig sj\u00e4lv","Man ska inte k\u00f6pa grisen i s\u00e4cken"],
"bin_data":"\\xFE\u0000\u00e2\\xF2"}]

将dump文件解析为原始字节,并在标准输出上打印JSON:

1
2
3
4
5
> rdb -c json /var/redis/6379/dump.rdb --escape raw

[{
"Citat":["B\u00c3\u00a4ttre sent \u00c3\u00a4n aldrig","Bra karl reder sig sj\u00c3\u00a4lv","Man ska inte k\u00c3\u00b6pa grisen i s\u00c3\u00a4cken"],
"bin_data":"\u00fe\u0000\u00c3\u00a2\u00f2"}]

生成内存报告:

使用-c memory 运行会生成CSV报告,其中包含该键使用的近似内存。 –bytes C 和 –largest N 可用于将输出限制为大于C字节的键或N个最大键。

复制代码

1
2
3
4
5
6
7
8
9
> rdb -c memory /var/redis/6379/dump.rdb --bytes 128 -f memory.csv
> cat memory.csv

database,type,key,size_in_bytes,encoding,num_elements,len_largest_element
0,list,lizards,241,quicklist,5,19
0,list,user_list,190,quicklist,3,7
2,hash,baloon,138,ziplist,3,11
2,list,armadillo,231,quicklist,5,20
2,hash,aroma,129,ziplist,3,11

复制代码

生成的CSV具有以下列:

复制代码

1
2
3
4
5
6
7
8
database:数据库编号
type:数据类型
key:键
size_in_bytes:使用的内存:包括键,值和任何其他开销
encoding:RDB编码类型
num_elements:key中的value的个数
len_largest_element:key中的value的长度
expiry:过期值

复制代码

注意:内存使用情况是近似的。 通常,实际使用的内存将略高于报告的内存。可以按键或数据库编号或数据类型过滤报告。内存报告应有助于检测由应用程序逻辑引起的内存泄漏。 它还将帮助优化Redis的内存使用。

查找单键使用的内存:

查找特定键使用的内存(运行整个内存报告非常耗时),使用redis-memory-for-key:

复制代码

1
2
3
4
5
6
7
8
9
10
> redis-memory-for-key person:1

> redis-memory-for-key -s localhost -p 6379 -a mypassword person:1

Key person:1
Bytes 111
Type hash
Encoding ziplist
Number of Elements 2
Length of Largest Element 8

复制代码

比较RDB文件:

使用–command diff选项,并将输出通过管道传递到标准sort:

1
2
> rdb --command diff /var/redis/6379/dump1.rdb | sort > dump1.txt
> rdb --command diff /var/redis/6379/dump2.rdb | sort > dump2.txt

运行差异程序:

1
> kdiff3 dump1.txt dump2.txt

要限制文件的大小,可以使用–key选项过滤键

使用Redis协议:

使用protocol命令将RDB文件转换为redis协议流:

复制代码

1
2
3
4
5
6
7
8
9
10
11
> rdb -c protocol /var/redis/6379/dump.rdb

*4
$4
HSET
$9
users:123
$9
firstname
$8
Sripathi

复制代码

可以将输出通过管道传输到netcat并重新导入数据的子集。如果要将数据在两个Redis实例上共享,则可以使用–key标志选择数据的子集,然后将输出传递给正在运行的Redis实例并加载该数据。 当输出打印协议时,–escape选项可以避免出现不可打印/控制字符。

默认情况下,如果过期时间在rdb文件中存在,则会删除过去所有过期的键。 如果不需要此行为,则使用-x/–no-expire选项将忽略所有关键的到期命令。使用-a/–amend-expire选项设置将来的到期时间,该选项会为已设置为到期的每个密钥的到期时间增加整数秒,不会更改尚未设置有效期的key。

使用解析器(Python):

img View Code

测试说明

一、rdb:根据要求分析这个RDB文件

  1. 按json格式导出rdb:

    rdb –command json dump.rdb

    **
    **

    img View Code

  2. 导出rdb中的keys:rdb -c justkeys dump.rdb

    img View Code

  3. 导出rdb中的values:rdb -c justkeyvals dump.rdb

    img View Code

  4. 导出rdb中keys的内存分析:

    rdb -c memory dump.rdb

    img View Code

  5. 按RESP协议导出RDB内容:

    rdb -c protocol dump.rdb

    img View Code

  6. 分析RDB结果导出到文件:

    rdb -c memory dump.rdb -f ttt.csv

    img View Code

  7. 导出指定数据库的keys:

    rdb -c justkeyvals dump.rdb -n **0
    **

    img View Code

  8. 导出***匹配(正则)的***keys:rdb –command justkeyvals –key “.*set*“ dump.rdb

    img View Code

  9. 不导出匹配(正则)的keys:rdb –command justkeyvals –not-key “.*set*“ dump.rdb

    img View Code

  10. 导出指定类型的keys:

    rdb –command json –type hash dump.rdb

    img View Code

  11. 导出大于指定字节的keys:

    rdb –command memory –bytes 128 dump.rdb

    img View Code

  12. 导出内存字节排名前3个keys:rdb –command memory –largest 3 dump.rdb

    img View Code

  13. 导出指定编码转义:rdb –command justkeyvals –escape raw dump.rdb

    img View Code

  14. 导出keys(过期keys除外):rdb –command memory –no-expire dump.rdb

  15. 导出keys(给过期keys添加时间):rdb –command memory –amend-expire 100 dump.rdb

以上操作参数可以相互叠加使用,按照实际要求进行组合。并且可以导出成csv文件,导入到数据库里进行聚合统计和监控。

二、redis-memory-for-key:查看指定key的内存

查看指定key的内存分析情况:redis-memory-for-key –server=192.168.163.134 –port=8379 f

img View Code

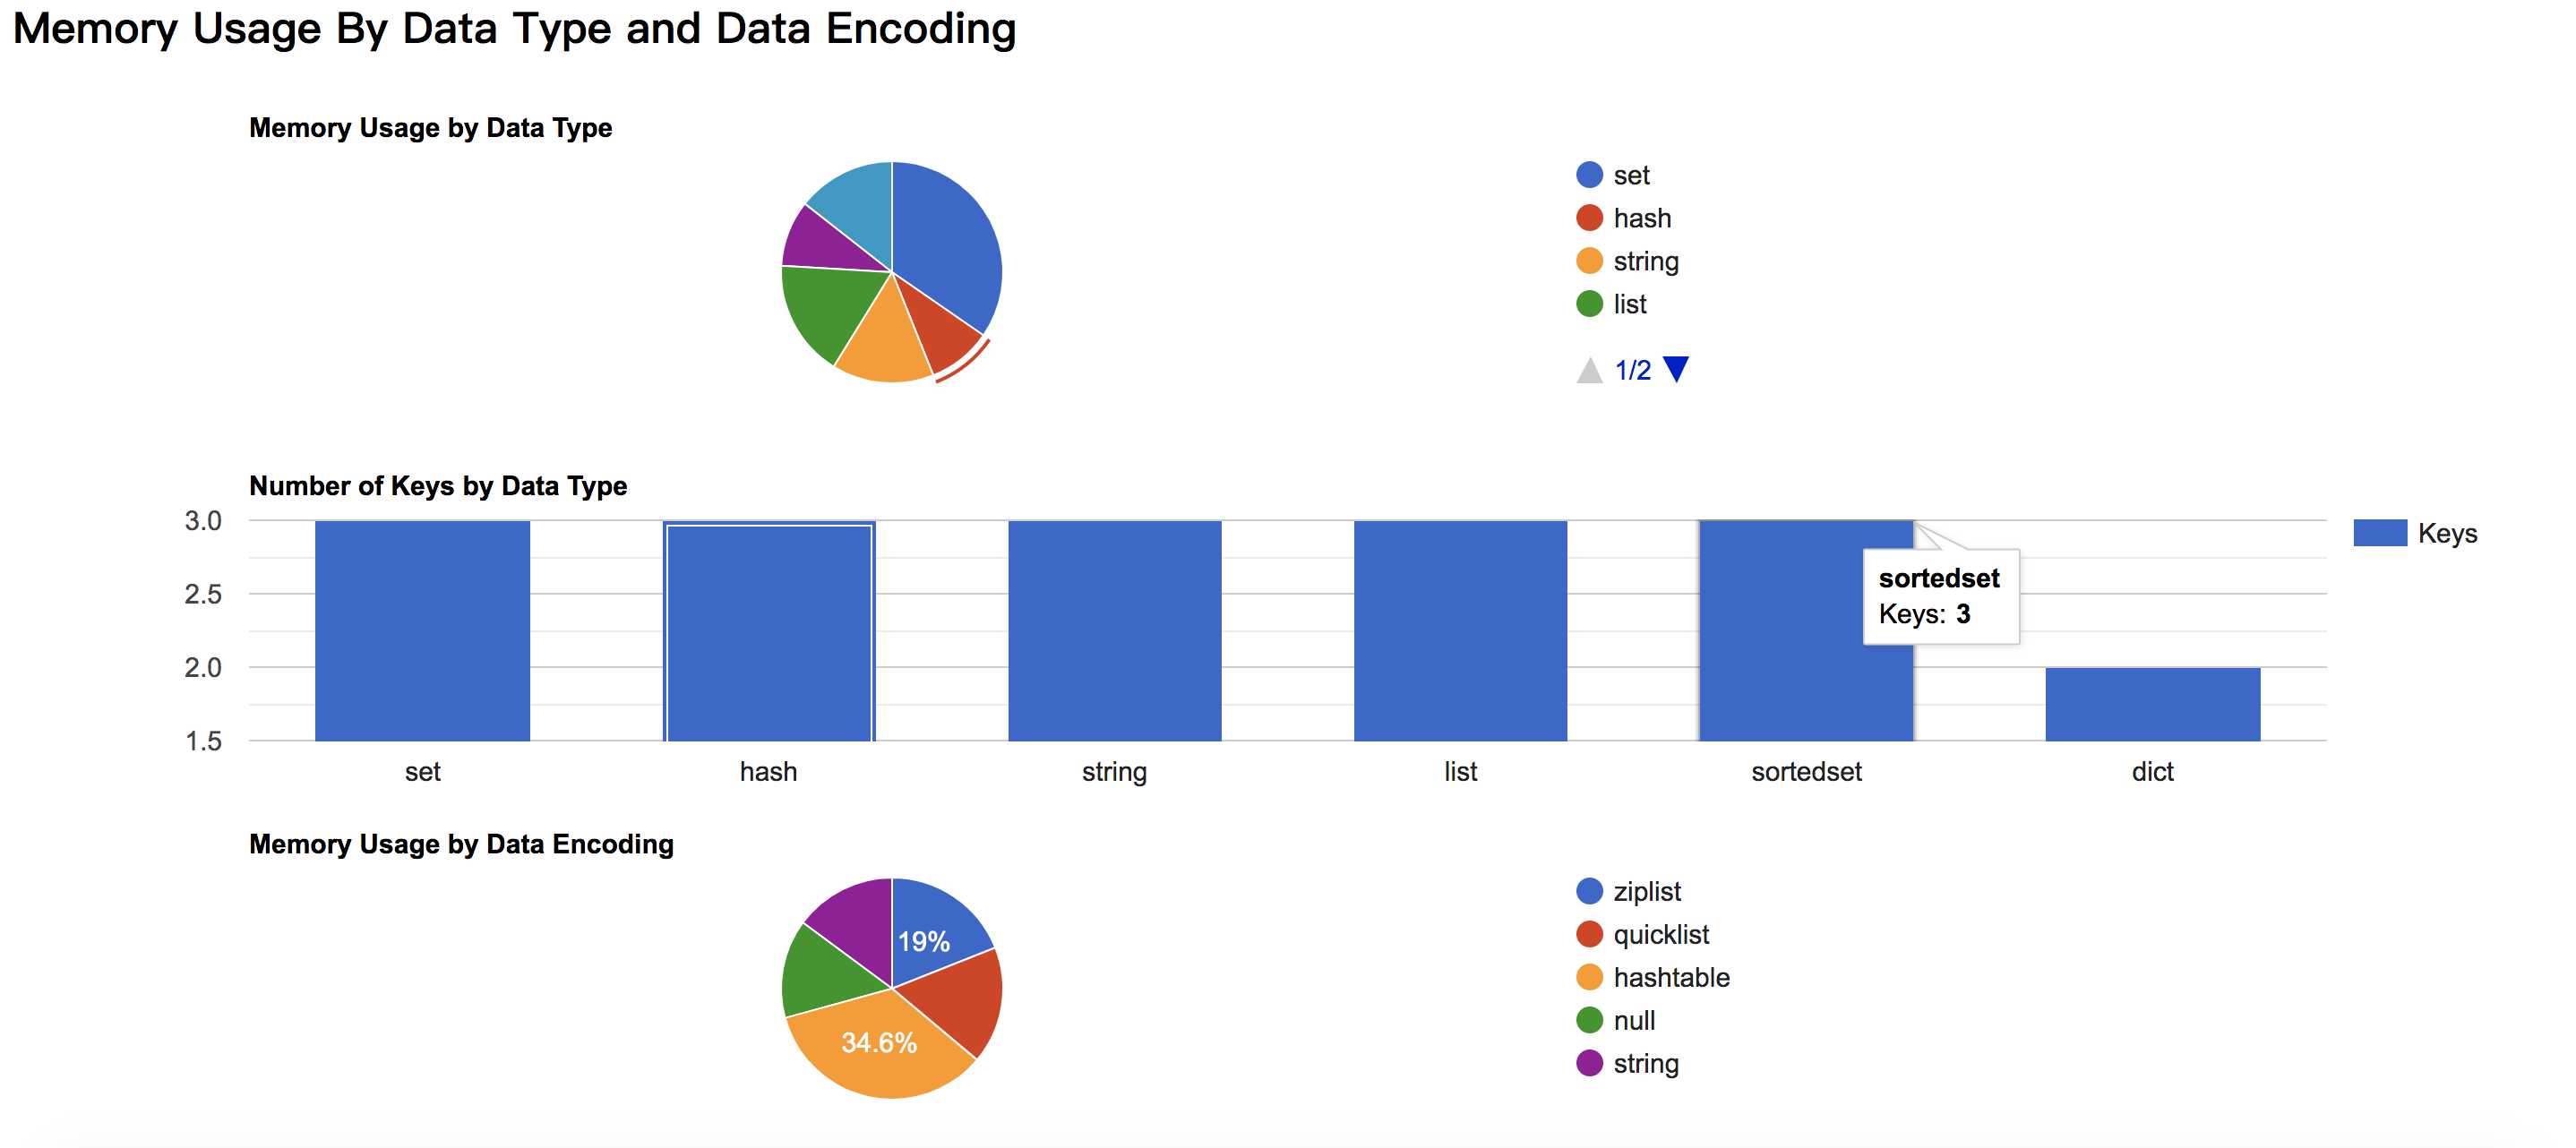
三、redis-profiler:RDB分析生成html

img View Code

分析后的效果图(一部分)如:

img

总结

通过本文对于rdbtools说明,能够更好的解析RDB其内部的存储信息,从而方便给出优化和维护的建议,关于rdbtools更多的说明可以看官网。

使用如下命令导出

1
2
3
# mysqldump -u root -p 数据库密码 数据库名称 > 具体备份路径

# mysqldump -u root -p mysite > /var/databakup/mysite.sql

导入数据库
首先需要创建数据库,如果已经存在就不用创建了。

1
2
3
4
5
6
7
8
9
mysql -u root -p
#根据提示输入密码后进入mysql控制台
show databases;
#创建数据库
create database mysite;
#进入数据库
use mysite;
#从文件导入所有数据
source /var/databakup/mysite.sql

作者:coreki
链接:https://www.jianshu.com/p/04416670d1e2
来源:简书

获取当前时间戳

1
2
3
4
5
6
7
8
9
10
11
12
13
14
15
16
mysql> select unix_timestamp(now());
+-----------------------+
| unix_timestamp(now()) |
+-----------------------+
| 1584524789 |
+-----------------------+
1 row in set (0.00 sec)
1234567
mysql> select unix_timestamp();
+------------------+
| unix_timestamp() |
+------------------+
| 1584524524 |
+------------------+
1 row in set (0.00 sec)
1234567

获取当前时间

1
2
3
4
5
6
7
8
9
10
11
12
13
14
15
16
mysql> select now();
+---------------------+
| now() |
+---------------------+
| 2020-03-18 17:39:13 |
+---------------------+
1 row in set (0.00 sec)
1234567
mysql> select date(now());
+-------------+
| date(now()) |
+-------------+
| 2020-03-18 |
+-------------+
1 row in set (0.00 sec)
1234567

获取三天前的时间

1
2
3
4
5
6
7
8
mysql> SELECT NOW() - interval 72 hour;
+--------------------------+
| NOW() - interval 72 hour |
+--------------------------+
| 2020-03-15 17:39:44 |
+--------------------------+
1 row in set (0.00 sec)
1234567

时间转时间戳

1
2
3
4
5
6
7
8
mysql> select unix_timestamp('2018-01-15 09:45:16');
+---------------------------------------+
| unix_timestamp('2018-01-15 09:45:16') |
+---------------------------------------+
| 1515980716 |
+---------------------------------------+
1 row in set (0.00 sec)
1234567

时间戳转时间

1
2
3
4
5
6
7
8
mysql> select from_unixtime(1515980716);
+---------------------------+
| from_unixtime(1515980716) |
+---------------------------+
| 2018-01-15 09:45:16 |
+---------------------------+
1 row in set (0.02 sec)
1234567

时间戳格式化

1
2
3
4
5
6
7
8
mysql> SELECT from_unixtime(1515980716, '%Y-%m-%d %H:%i:%S');
+------------------------------------------------+
| from_unixtime(1515980716, '%Y-%m-%d %H:%i:%S') |
+------------------------------------------------+
| 2018-01-15 09:45:16 |
+------------------------------------------------+
1 row in set (0.00 sec)
1234567

时间格式化

1
2
3
4
5
6
7
8
9
10
11
12
13
14
15
16
mysql> select date_format(now(), '%Y-%m-%d');
+--------------------------------+
| date_format(now(), '%Y-%m-%d') |
+--------------------------------+
| 2020-03-18 |
+--------------------------------+
1 row in set (0.00 sec)

mysql> select date_format('2018-01-15 09:45:16', '%Y-%m-%d');
+------------------------------------------------+
| date_format('2018-01-15 09:45:16', '%Y-%m-%d') |
+------------------------------------------------+
| 2018-01-15 |
+------------------------------------------------+
1 row in set (0.00 sec)
123456789101112131415

可视化转换

http://tool.chinaz.com/Tools/unixtime.aspx

mysql
mysql

函数:FROM_UNIXTIME
作用:将MYSQL中以INT(11)存储的时间以”YYYY-MM-DD”格式来显示。
语法:FROM_UNIXTIME(unix_timestamp,format)

返回表示 Unix 时间标记的一个字符串,根据format字符串格式化。format可以包含与DATE_FORMAT()函数列出的条目同样的修饰符。

根据format字符串格式化date值。
下列修饰符可以被用在format字符串中:

%M 月名字(January……December)
%W 星期名字(Sunday……Saturday)
%D 有英语前缀的月份的日期(1st, 2nd, 3rd, 等等。)
%Y 年, 数字, 4 位
%y 年, 数字, 2 位
%a 缩写的星期名字(Sun……Sat)
%d 月份中的天数, 数字(00……31)
%e 月份中的天数, 数字(0……31)
%m 月, 数字(01……12)
%c 月, 数字(1……12)
%b 缩写的月份名字(Jan……Dec)
%j 一年中的天数(001……366)
%H 小时(00……23)
%k 小时(0……23)
%h 小时(01……12)
%I 小时(01……12)
%l 小时(1……12)
%i 分钟, 数字(00……59)
%r 时间,12 小时(hh:mm:ss [AP]M)
%T 时间,24 小时(hh:mm:ss)
%S 秒(00……59)
%s 秒(00……59)
%p AM或PM
%w 一个星期中的天数(0=Sunday ……6=Saturday )
%U 星期(0……52), 这里星期天是星期的第一天
%u 星期(0……52), 这里星期一是星期的第一天
%% 一个文字“%”。

例子:

SELECT FROM_UNIXTIME(1234567890, ‘%Y-%m-%d %H:%i:%S’)
SELECT *,FROM_UNIXTIME(created, ‘%Y-%m-%d’) as riqi FROM rc_ms_users