0%

在开发的时候有时候经常会看到这样代码

在这里插入图片描述

这是Spring的一个特殊的注入功能

如图所示

当注入一个Map的时候 ,value泛型为MaoService,则注入后Spring会将实例化后的bean放入value ,key则为注入后bean的名字

当注入一个List的时候,List的泛型为MaoService,则注入后Spring会将实例化的bean放入List中

做个测试

首先定义一个接口

1
2
3
4
5
6
7
package com.service;

public interface MaoService {

void say();
}

然后定义三个MaoService的实现类 Fish 、Dog、 Cat

1
2
3
4
5
6
7
8
9
10
11
12
13
14
15
16
17
18
19
20
21
22
23
24
25
26
27
28
29
30
31
32
33
34
35
36
37
38
package com.service.impl;

import com.service.MaoService;
import org.springframework.stereotype.Component;

@Component
public class Fish implements MaoService {
@Override
public void say() {
System.out.println("xuxuxu");
}
}

package com.service.impl;

import com.service.MaoService;
import org.springframework.stereotype.Component;
@Component
public class Dog implements MaoService {
@Override
public void say() {
System.out.println("汪汪汪");
}
}

package com.service.impl;

import com.service.MaoService;
import org.springframework.stereotype.Component;

@Component
public class Cat implements MaoService {
@Override
public void say() {
System.out.println("喵喵喵");
}
}

在编写一个测试类

1
2
3
4
5
6
7
8
9
10
11
12
13
14
15
16
17
18
19
20
21
22
23
24
25
26
27
package com.service;

import org.springframework.beans.factory.annotation.Autowired;
import org.springframework.stereotype.Component;

import java.util.List;
import java.util.Map;

@Component
public class Test {

@Autowired
private Map<String,MaoService> maoServiceMap;

@Autowired
private List<MaoService> maoServiceList;


public void sendMap(){
this.maoServiceMap.get("cat").say();
}

public void sendList(){
this.maoServiceList.get(0).say();
}
}

然后使用SpringTest

1
2
3
4
5
6
7
8
9
10
11
12
13
14
15
16
17
18
19
20
21
22
23
24
25
package com;

import org.junit.Test;
import org.junit.runner.RunWith;
import org.springframework.beans.factory.annotation.Autowired;
import org.springframework.boot.test.context.SpringBootTest;
import org.springframework.test.context.junit4.SpringRunner;

@RunWith(SpringRunner.class)
@SpringBootTest
public class TestApplicationTests {

@Autowired
private com.service.Test maoService;
@Test
public void sayMap(){
this.maoService.sendMap();
}

@Test
public void sayList(){
this.maoService.sendList();
}

}

DeBug进去看看

在这里插入图片描述

Map的key为bean的名字 value是bean的实例

紧接着为List

在这里插入图片描述

Spring吧bean放入了List中 那个这个顺序怎么控制呢

在实现类中加入@Order(value) 注解即可 ,值越小越先被初始化越先被放入List

救命用的 git reflog(恢复 git reset –hard)

今天不小心手贱没有 push 到 remote 就执行了 git reset –hard xxxx,然后新提交的代码都没了。。。。。
两天的工作量啊!!

在万能的度娘的帮助下找到了 git reflog 这个救命用的命令

1
2
3
dcf7d96 HEAD@{5}: reset: moving to dcf7d96a348faa49e892b4f2d67c2b1dff342b50
402f567 HEAD@{6}: pull origin master: Merge made by the 'recursive' strategy.
eaef723 HEAD@{7}: commit (initial): init project

执行 git reset –hard eaef723 就可以恢复到需要恢复的 commit 了

本文从实例出发,介绍 CompletableFuture 基本用法。不过讲的再多,不如亲自上手练习一下。所以建议各位小伙伴看完,上机练习一把,快速掌握 CompletableFuture

转载地址:https://sourl.cn/s5MbCm

全文摘要:

  • Future VS CompletableFuture
  • CompletableFuture 基本用法

0x00. 前言

一些业务场景我们需要使用多线程异步执行任务,加快任务执行速度。 Java 提供 Runnable Future<V> 两个接口用来实现异步任务逻辑。

虽然 Future<V> 可以获取任务执行结果,但是获取方式十方不变。我们不得不使用Future#get 阻塞调用线程,或者使用轮询方式判断 Future#isDone 任务是否结束,再获取结果。

这两种处理方式都不是很优雅,JDK8 之前并发类库没有提供相关的异步回调实现方式。没办法,我们只好借助第三方类库,如 Guava,扩展 Future,增加支持回调功能。相关代码如下:

img

虽然这种方式增强了 Java 异步编程能力,但是还是无法解决多个异步任务需要相互依赖的场景。

举一个生活上的例子,假如我们需要出去旅游,需要完成三个任务:

  • 任务一:订购航班
  • 任务二:订购酒店
  • 任务三:订购租车服务

很显然任务一和任务二没有相关性,可以单独执行。但是任务三必须等待任务一与任务二结束之后,才能订购租车服务。

为了使任务三时执行时能获取到任务一与任务二执行结果,我们还需要借助 CountDownLatch

img

0x01. CompletableFuture

JDK8 之后,Java 新增一个功能十分强大的类:CompletableFuture。单独使用这个类就可以轻松的完成上面的需求:

img

大家可以先不用管 CompletableFuture 相关 API,下面将会具体讲解。

对比 Future<V>CompletableFuture 优点在于:

  • 不需要手工分配线程,JDK 自动分配
  • 代码语义清晰,异步任务链式调用
  • 支持编排异步任务

怎么样,是不是功能很强大?接下来抓稳了,小黑哥要发车了。

img

1.1 方法一览

首先来通过 IDE 查看下这个类提供的方法:

img

稍微数一下,这个类总共有 50 多个方法,我的天。。。

img

不过也不要怕,小黑哥帮你们归纳好了,跟着小黑哥的节奏,带你们掌握 CompletableFuture

若图片不清晰,可以关注『程序通事』,回复:『233』,获取该思维导图

img

1.2 创建 CompletableFuture 实例

创建 CompletableFuture 对象实例我们可以使用如下几个方法:

img

第一个方法创建一个具有默认结果的 CompletableFuture,这个没啥好讲。我们重点讲述下下面四个异步方法。

前两个方法 runAsync 不支持返回值,而 supplyAsync可以支持返回结果。

这个两个方法默认将会使用公共的 ForkJoinPool 线程池执行,这个线程池默认线程数是 CPU 的核数。

可以设置 JVM option:-Djava.util.concurrent.ForkJoinPool.common.parallelism 来设置 ForkJoinPool 线程池的线程数

使用共享线程池将会有个弊端,一旦有任务被阻塞,将会造成其他任务没机会执行。所以强烈建议使用后两个方法,根据任务类型不同,主动创建线程池,进行资源隔离,避免互相干扰。

1.3 设置任务结果

CompletableFuture 提供以下方法,可以主动设置任务结果。

1
2
boolean complete(T value)
boolean completeExceptionally(Throwable ex)

第一个方法,主动设置 CompletableFuture 任务执行结果,若返回 true,表示设置成功。如果返回 false,设置失败,这是因为任务已经执行结束,已经有了执行结果。

示例代码如下:

1
2
3
4
5
6
7
8
9
10
11
12
13
14
15
16
17
18
19
20
21
22
23
24
25
26
27
// 执行异步任务
CompletableFuture cf = CompletableFuture.supplyAsync(() -> {
System.out.println("cf 任务执行开始");
sleep(10, TimeUnit.SECONDS);
System.out.println("cf 任务执行结束");
return "楼下小黑哥";
});
//
Executors.newSingleThreadScheduledExecutor().execute(() -> {
sleep(5, TimeUnit.SECONDS);
System.out.println("主动设置 cf 任务结果");
// 设置任务结果,由于 cf 任务未执行结束,结果返回 true
cf.complete("程序通事");
});
// 由于 cf 未执行结束,将会被阻塞。5 秒后,另外一个线程主动设置任务结果
System.out.println("get:" + cf.get());
// 等待 cf 任务执行结束
sleep(10, TimeUnit.SECONDS);
// 由于已经设置任务结果,cf 执行结束任务结果将会被抛弃
System.out.println("get:" + cf.get());
/***
* cf 任务执行开始
* 主动设置 cf 任务结果
* get:程序通事
* cf 任务执行结束
* get:程序通事
*/

这里需要注意一点,一旦 complete 设置成功,CompletableFuture 返回结果就不会被更改,即使后续 CompletableFuture 任务执行结束。

第二个方法,给 CompletableFuture 设置异常对象。若设置成功,如果调用 get 等方法获取结果,将会抛错。

示例代码如下:

1
2
3
4
5
6
7
8
9
10
11
12
13
14
15
16
17
18
19
20
21
22
// 执行异步任务
CompletableFuture cf = CompletableFuture.supplyAsync(() -> {
System.out.println("cf 任务执行开始");
sleep(10, TimeUnit.SECONDS);
System.out.println("cf 任务执行结束");
return "楼下小黑哥";
});
//
Executors.newSingleThreadScheduledExecutor().execute(() -> {
sleep(5, TimeUnit.SECONDS);
System.out.println("主动设置 cf 异常");
// 设置任务结果,由于 cf 任务未执行结束,结果返回 true
cf.completeExceptionally(new RuntimeException("啊,挂了"));
});
// 由于 cf 未执行结束,前 5 秒将会被阻塞。后续程序抛出异常,结束
System.out.println("get:" + cf.get());
/***
* cf 任务执行开始
* 主动设置 cf 异常
* java.util.concurrent.ExecutionException: java.lang.RuntimeException: 啊,挂了
* ......
*/

1.4 CompletionStage

CompletableFuture 分别实现两个接口 FutureCompletionStage

img

Future 接口大家都比较熟悉,这里主要讲讲 CompletionStage

CompletableFuture 大部分方法来自CompletionStage 接口,正是因为这个接口,CompletableFuture才有如从强大功能。

想要理解 CompletionStage 接口,我们需要先了解任务的时序关系的。我们可以将任务时序关系分为以下几种:

  • 串行执行关系
  • 并行执行关系
  • AND 汇聚关系
  • OR 汇聚关系

1.5 串行执行关系

任务串行执行,下一个任务必须等待上一个任务完成才可以继续执行。

img

CompletionStage 有四组接口可以描述串行这种关系,分别为:

img

thenApply 方法需要传入核心参数为 Function<T,R>类型。这个类核心方法为:

1
R apply(T t)

所以这个接口将会把上一个任务返回结果当做入参,执行结束将会返回结果。

thenAccept 方法需要传入参数对象为 Consumer<T>类型,这个类核心方法为:

1
void accept(T t)

返回值 void 可以看出,这个方法不支持返回结果,但是需要将上一个任务执行结果当做参数传入。

thenRun 方法需要传入参数对象为 Runnable 类型,这个类大家应该都比较熟悉,核心方法既不支持传入参数,也不会返回执行结果。

thenCompose 方法作用与 thenApply 一样,只不过 thenCompose 需要返回新的 CompletionStage。这么理解比较抽象,可以集合代码一起理解。

img

方法中带有 Async ,代表可以异步执行,这个系列还有重载方法,可以传入自定义的线程池,上图未展示,读者只可以自行查看 API。

最后我们通过代码展示 thenApply 使用方式:

1
2
3
4
5
6
CompletableFuture<String> cf
= CompletableFuture.supplyAsync(() -> "hello,楼下小黑哥")// 1
.thenApply(s -> s + "@程序通事") // 2
.thenApply(String::toUpperCase); // 3
System.out.println(cf.join());
// 输出结果 HELLO,楼下小黑哥@程序通事

这段代码比较简单,首先我们开启一个异步任务,接着串行执行后续两个任务。任务 2 需要等待任务1 执行完成,任务 3 需要等待任务 2。

上面方法,大家需要记住了 Function<T,R>Consumer<T>Runnable 三者区别,根据场景选择使用。

1.6 AND 汇聚关系

AND 汇聚关系代表所有任务完成之后,才能进行下一个任务。

img

如上所示,只有任务 A 与任务 B 都完成之后,任务 C 才会开始执行。

CompletionStage 有以下接口描述这种关系。

img

thenCombine 方法核心参数 BiFunction ,作用与 Function一样,只不过 BiFunction 可以接受两个参数,而 Function 只能接受一个参数。

thenAcceptBoth 方法核心参数BiConsumer 作用也与 Consumer一样,不过其需要接受两个参数。

runAfterBoth 方法核心参数最简单,上面已经介绍过,不再介绍。

这三组方法只能完成两个任务 AND 汇聚关系,如果需要完成多个任务汇聚关系,需要使用 CompletableFuture#allOf,不过这里需要注意,这个方法是不支持返回任务结果。

AND 汇聚关系相关示例代码,开头已经使用过了,这里再粘贴一下,方便大家理解:

img

1.7 OR 汇聚关系

有 AND 汇聚关系,当然也存在 OR 汇聚关系。OR 汇聚关系代表只要多个任务中任一任务完成,就可以接着接着执行下一任务。

img

CompletionStage 有以下接口描述这种关系:

img

前面三组接口方法传参与 AND 汇聚关系一致,这里也不再详细解释了。

当然 OR 汇聚关系可以使用 CompletableFuture#anyOf 执行多个任务。

下面示例代码展示如何使用 applyToEither 完成 OR 关系。

1
2
3
4
5
6
7
8
9
10
11
12
13
14
15
16
CompletableFuture<String> cf
= CompletableFuture.supplyAsync(() -> {
sleep(5, TimeUnit.SECONDS);
return "hello,楼下小黑哥";
});// 1

CompletableFuture<String> cf2 = cf.supplyAsync(() -> {
sleep(3, TimeUnit.SECONDS);
return "hello,程序通事";
});
// 执行 OR 关系
CompletableFuture<String> cf3 = cf2.applyToEither(cf, s -> s);

// 输出结果,由于 cf2 只休眠 3 秒,优先执行完毕
System.out.println(cf2.join());
// 结果:hello,程序通事

1.8 异常处理

CompletableFuture 方法执行过程若产生异常,当调用 getjoin 获取任务结果才会抛出异常。

img

上面代码我们显示使用 try..catch 处理上面的异常。不过这种方式不太优雅,CompletionStage 提供几个方法,可以优雅处理异常。

img

exceptionally 使用方式类似于 try..catchcatch代码块中异常处理。

whenCompletehandle 方法就类似于 try..catch..finanllyfinally 代码块。无论是否发生异常,都将会执行的。这两个方法区别在于 handle 支持返回结果。

下面示例代码展示 handle 用法:

1
2
3
4
5
6
7
8
9
10
11
12
13
14
15
16
17
18
19
20
21
22
CompletableFuture<Integer>
f0 = CompletableFuture.supplyAsync(() -> (7 / 0))
.thenApply(r -> r * 10)
.handle((integer, throwable) -> {
// 如果异常存在,打印异常,并且返回默认值
if (throwable != null) {
throwable.printStackTrace();
return 0;
} else {
// 如果
return integer;
}
});


System.out.println(f0.join());
/**
*java.util.concurrent.CompletionException: java.lang.ArithmeticException: / by zero
* .....
*
* 0
*/

0x02. 总结

JDK8 提供 CompletableFuture 功能非常强大,可以编排异步任务,完成串行执行,并行执行,AND 汇聚关系,OR 汇聚关系。

不过这个类方法实在太多,且方法还需要传入各种函数式接口,新手刚开始使用会直接会被弄懵逼。这里帮大家在总结一下三类核心参数的作用

  • Function 这类函数接口既支持接收参数,也支持返回值
  • Consumer 这类接口函数只支持接受参数,不支持返回值
  • Runnable 这类接口不支持接受参数,也不支持返回值

搞清楚函数参数作用以后,然后根据串行,AND 汇聚关系,OR 汇聚关系归纳一下相关方法,这样就比较好理解了

最后再贴一下,文章开头的思维导图,希望对你有帮助。

img

0x03. 帮助文档

  1. 极客时间-并发编程专栏
  2. https://colobu.com/2016/02/29/Java-CompletableFuture
  3. https://www.ibm.com/developerworks/cn/java/j-cf-of-jdk8/index.html

最后说一句(求关注)

CompletableFuture 很早之前就有关注,本以为跟 Future一样,使用挺简单,谁知道学的时候才发现好难。各种 API 方法看的头有点大。

后来看到极客时间-『并发编程』专栏使用归纳方式分类 CompletableFuture 各种方法,一下子就看懂了。所这篇文章也参考这种归纳方式。

这篇文章找资料,整理一个星期,幸好今天顺利产出。

看在小黑哥写的这么辛苦的份上,点个关注吧,赏个赞呗。别下次一定啊,大哥!写文章很辛苦的,需要来点正反馈。

才疏学浅,难免会有纰漏,如果你发现了错误的地方,还请你留言给我指出来,我对其加以修改。

选购指标

  • 电机:好坏参考保修,无刷电机损耗小,寿命肯定更长。
  • 刹车:碟刹优于鼓刹 ,同样价格下,有碟刹的更安全。
  • 电池:锂电更轻,同样重量体积下,续航更久,充电更方便。
  • 轮胎:尽量选择真空防扎轮胎,能大幅减低破胎概率,这点很实用。
  • 工艺:如果线下购买,试驾测试下过隔离带的避震效果,如果是要散架的感觉那还是劝退吧。
  • 车架:焊接处越少越好,单管车架最稳定最安全。

简介: docker 强制删除(rm -f)container时出现错误提示 [root@Ieat1 ~]# docker rm -f nginx Error response from daemon: Driver devicemapper failed t…

docker 强制删除(rm -f)container时出现错误提示

1
2
[root@Ieat1 ~]# docker rm -f nginx
Error response from daemon: Driver devicemapper failed to remove root filesystem a838d837988a593de3e997748cc80b1540dd31697f66e93dad275fbeaa5b3278: Device is Busy

查看容器状态

1
2
[root@Ieat1 ~]# docker ps -a|grep nginx
a838d837988a nginx "nginx -g 'daemon ..." 3 weeks ago Dead

发现它是 status为dead的容器,实际上,吞掉这个错误就可以了

1
2
docker stop nginx 1>/dev/null 2>&1 | exit 0
docker rm -f nginx 1>/dev/null 2>&1 | exit 0

再次查看发现已经删除掉了

1
[root@Ieat1 ~]# docker ps -a|grep nginx

Flowcharts - Basic Syntax

source

Graph

This statement declares the direction of the Flowchart.

This declares the graph is oriented from top to bottom (TD or TB).

graph TD
    Start --> Stop

StartStop

This declares the graph is oriented from left to right (LR).

graph LR
    Start --> Stop

StartStop

Flowchart Orientation

Possible FlowChart orientations are:

  • TB - top to bottom
  • TD - top-down/ same as top to bottom
  • BT - bottom to top
  • RL - right to left
  • LR - left to right

Flowcharts

This renders a flowchart that allows for features such as: more arrow types, multi directional arrows, and linking to and from subgraphs.

Apart from the graph type, the syntax is the same. This is currently experimental but when the beta period is over, both the graph and flowchart keywords will render in the new way. This means it is ok to start beta testing flowcharts.

Important note Do not type the word “end” as a Flowchart node. Capitalize all or any one the letters to keep the flowchart from breaking, i.e, “End” or “END”. Or you can apply this workaround.**

Nodes & shapes

A node (default)

graph LR
    id

id

Note The id is what is displayed in the box.

A node with text

It is also possible to set text in the box that differs from the id. If this is done several times, it is the last text found for the node that will be used. Also if you define edges for the node later on, you can omit text definitions. The one previously defined will be used when rendering the box.

graph LR
    id1[This is the text in the box]

This is the text in the box

Node Shapes

A node with round edges

graph LR
    id1(This is the text in the box)

This is the text in the box

A stadium-shaped node

graph LR
    id1([This is the text in the box])

This is the text in the box

A node in a subroutine shape

graph LR
    id1[[This is the text in the box]]

This is the text in the box

A node in a cylindrical shape

graph LR
    id1[(Database)]

Database

A node in the form of a circle

graph LR
    id1((This is the text in the circle))

This is the text in the circle

A node in an asymetric shape

graph LR
    id1>This is the text in the box]

This is the text in the box

Currently only the shape above is possible and not its mirror. This might change with future releases.

A node (rhombus)

graph LR
    id1{This is the text in the box}

This is the text in the box

A hexagon node

graph LR
    id1{{This is the text in the box}}

This is the text in the box

Parallelogram

graph TD
    id1[/This is the text in the box/]

This is the text in the box

Parallelogram alt

graph TD
    id1[\This is the text in the box\]

This is the text in the box

Trapezoid

graph TD
    A[/Christmas\]

Christmas

Trapezoid alt

graph TD
    B[\Go shopping/]

Go shopping

Nodes can be connected with links/edges. It is possible to have different types of links or attach a text string to a link.

graph LR
    A-->B

AB

graph LR
    A --- B

AB

graph LR
    A-- This is the text! ---B

This is the textAB

or

graph LR
    A---|This is the text|B

This is the textAB

graph LR
    A-->|text|B

textAB

or

graph LR
    A-- text -->B

textAB

graph LR;
   A-.->B;

AB

graph LR
   A-. text .-> B

textAB

graph LR
   A ==> B

AB

graph LR
   A == text ==> B

textAB

It is possible declare many links in the same line as per below:

graph LR
   A -- text --> B -- text2 --> C

texttext2ABC

It is also possible to declare multiple nodes links in the same line as per below:

graph LR
   a --> b & c--> d

abcd

You can then describe dependencies in a very expressive way. Like the one-liner below:

graph TB
    A & B--> C & D

ABCD

If you describe the same diagram using the the basic syntax, it will take four lines. A word of warning, one could go overboard with this making the graph harder to read in markdown form. The Swedish word lagom comes to mind. It means, not too much and not too little. This goes for expressive syntaxes as well.

graph TB
    A --> C
    A --> D
    B --> C
    B --> D

Beta: New arrow types

When using flowchart instead of graph there are new types of arrows supported as per below:

1
2
3
flowchart LR
A --o B
B --x C

ABC

Beta: Multi directional arrows

When using flowchart instead of graph there is the possibility to use multidirectional arrows.

1
2
3
4
flowchart LR
A o--o B
B <--> C
C x--x D

ABCD

Each node in the flowchart is ultimately assigned to a rank in the rendered graph, i.e. to a vertical or horizontal level (depending on the flowchart orientation), based on the nodes to which it is linked. By default, links can span any number of ranks, but you can ask for any link to be longer than the others by adding extra dashes in the link definition.

In the following example, two extra dashes are added in the link from node B to node E, so that it spans two more ranks than regular links:

graph TD
    A[Start] --> B{Is it?};
    B -->|Yes| C[OK];
    C --> D[Rethink];
    D --> B;
    B ---->|No| E[End];

YesNoStartIs it?OKRethinkEnd

Note Links may still be made longer than the requested number of ranks by the rendering engine to accommodate other requests.

When the link label is written in the middle of the link, the extra dashes must be added on the right side of the link. The following example is equivalent to the previous one:

graph TD
    A[Start] --> B{Is it?};
    B -- Yes --> C[OK];
    C --> D[Rethink];
    D --> B;
    B -- No ----> E[End];

YesNoStartIs it?OKRethinkEnd

For dotted or thick links, the characters to add are equals signs or dots, as summed up in the following table:

Length 1 2 3
Normal --- ---- -----
Normal with arrow --> ---> ---->
Thick === ==== =====
Thick with arrow ==> ===> ====>
Dotted -.- -..- -...-
Dotted with arrow -.-> -..-> -...->

Special characters that break syntax

It is possible to put text within quotes in order to render more troublesome characters. As in the example below:

graph LR
    id1["This is the (text) in the box"]

This is the (text) in the box

Entity codes to escape characters

It is possible to escape characters using the syntax examplified here.

1
2
graph LR
A["A double quote:#quot;"] -->B["A dec char:#9829;"]

A double quote:”A dec char:♥

Subgraphs

1
2
3
subgraph title
graph definition
end

An example below:

graph TB
    c1-->a2
    subgraph one
    a1-->a2
    end
    subgraph two
    b1-->b2
    end
    subgraph three
    c1-->c2
    end

threetwoonec2c1b2b1a2a1

You can also set an excplicit id for the subgraph.

graph TB
    c1-->a2
    subgraph ide1 [one]
    a1-->a2
    end

onea2a1c1

Beta: flowcharts

With the graphtype flowcharts it is also possible to set edges to and from subgraphs as in the graph below.

flowchart TB
    c1-->a2
    subgraph one
    a1-->a2
    end
    subgraph two
    b1-->b2
    end
    subgraph three
    c1-->c2
    end
    one --> two
    three --> two
    two --> c2

threeonec2c1twob2b1a2a1

Interaction

It is possible to bind a click event to a node, the click can lead to either a javascript callback or to a link which will be opened in a new browser tab. Note: This functionality is disabled when using securityLevel='strict' and enabled when using securityLevel='loose'.

1
click nodeId callback
  • nodeId is the id of the node
  • callback is the name of a javascript function defined on the page displaying the graph, the function will be called with the nodeId as parameter.

Examples of tooltip usage below:

<script>
  var callback = function(){
      alert('A callback was triggered');
  }
</script>
graph LR;
    A-->B;
    click A callback "Tooltip for a callback"
    click B "http://www.github.com" "This is a tooltip for a link"

The tooltip text is surrounded in double quotes. The styles of the tooltip are set by the class .mermaidTooltip.

AB

Success The tooltip functionality and the ability to link to urls are available from version 0.5.2.

?> Due to limitations with how Docsify handles JavaScript callback functions, an alternate working demo for the above code can be viewed at this jsfiddle.

Links are opened in the same browser tab/window by default. It is possible to change this by adding a link target to the click definition (_self, _blank, _parent and _top are supported):

graph LR;
    A-->B;
    B-->C;
    click A "http://www.github.com" 
    click B "http://www.github.com" "Open this in a new tab" _blank

ABC

Beginners tip, a full example using interactive links in a html context:

1
2
3
4
5
6
7
8
9
10
11
12
13
14
15
16
17
18
19
20
21
22
23
24
25
<body>
<div class="mermaid">
graph LR;
A-->B;
click A callback "Tooltip"
click B "http://www.github.com" "This is a link"
</div>

<script>
var callback = function(){
alert('A callback was triggered');
}
var config = {
startOnLoad:true,
flowchart:{
useMaxWidth:true,
htmlLabels:true,
curve:'cardinal',
},
securityLevel:'loose',
};

mermaid.initialize(config);
</script>
</body>

Comments

Comments can be entered within a flow diagram, which will be ignored by the parser. Comments need to be on their own line, and must be prefaced with %% (double percent signs). Any text after the start of the comment to the next newline will be treated as a comment, including any flow syntax

graph LR
%% this is a comment A -- text --> B{node}
   A -- text --> B -- text2 --> C

Styling and classes

It is possible to style links. For instance you might want to style a link that is going backwards in the flow. As links have no ids in the same way as nodes, some other way of deciding what style the links should be attached to is required. Instead of ids, the order number of when the link was defined in the graph is used. In the example below the style defined in the linkStyle statement will belong to the fourth link in the graph:

1
linkStyle 3 stroke:#ff3,stroke-width:4px,color:red;

Styling a node

It is possible to apply specific styles such as a thicker border or a different background color to a node.

graph LR
    id1(Start)-->id2(Stop)
    style id1 fill:#f9f,stroke:#333,stroke-width:4px
    style id2 fill:#bbf,stroke:#f66,stroke-width:2px,color:#fff,stroke-dasharray: 5 5

StartStop

Classes

More convenient then defining the style every time is to define a class of styles and attach this class to the nodes that should have a different look.

a class definition looks like the example below:

1
classDef className fill:#f9f,stroke:#333,stroke-width:4px;

Attachment of a class to a node is done as per below:

1
class nodeId1 className;

It is also possible to attach a class to a list of nodes in one statement:

1
class nodeId1,nodeId2 className;

A shorter form of adding a class is to attach the classname to the node using the :::operator as per below:

graph LR
    A:::someclass --> B
    classDef someclass fill:#f96;

AB

Css classes

It is also possible to predefine classes in css styles that can be applied from the graph definition as in the example below:

Example style

1
2
3
4
5
6
7
<style>
.cssClass > rect{
fill:#FF0000;
stroke:#FFFF00;
stroke-width:4px;
}
</style>

Example definition

graph LR;
    A-->B[AAA<span>BBB</span>];
    B-->D;
    class A cssClass;

AAAABBBD

Default class

If a class is named default it will be assigned to all classes without specific class definitions.

1
classDef default fill:#f9f,stroke:#333,stroke-width:4px;

Basic support for fontawesome

It is possible to add icons from fontawesome.

The icons are acessed via the syntax fa:#icon class name#.

graph TD
    B["fa:fa-twitter for peace"]
    B-->C[fa:fa-ban forbidden]
    B-->D(fa:fa-spinner);
    B-->E(A fa:fa-camera-retro perhaps?);

for peace forbiddenA perhaps?

  • In graph declarations, the statements also can now end without a semicolon. After release 0.2.16, ending a graph statement with semicolon is just optional. So the below graph declaration is also valid along with the old declarations of the graph.
  • A single space is allowed between vertices and the link. However there should not be any space between a vertex and its text and a link and its text. The old syntax of graph declaration will also work and hence this new feature is optional and is introduce to improve readability.

Below is the new declaration of the graph edges which is also valid along with the old declaration of the graph edges.

graph LR
    A[Hard edge] -->|Link text| B(Round edge)
    B --> C{Decision}
    C -->|One| D[Result one]
    C -->|Two| E[Result two]

Link textOneTwoHard edgeRound edgeDecisionResult oneResult two

Configuration…

Is it possible to adjust the width of the rendered flowchart.

This is done by defining mermaid.flowchartConfig or by the CLI to use a json file with the configuration. How to use the CLI is described in the mermaidCLI page. mermaid.flowchartConfig can be set to a JSON string with config parameters or the corresponding object.

1
2
3
mermaid.flowchartConfig = {
width: 100%
}

SonarQube的LTS版本以6.7和7.9较为具有代表性,这篇文章整理了一下SonarQube LTS 6.7.1 + MySQL的环境搭建方式。

SonarQube 6.7.1

这里使用Alpine版本的SonarQube 6.7.1和MySQL 5.7.16进行环境搭建,docker-compose.yml如下所示

docker-compose.yml文件

1
2
3
4
5
6
7
8
9
10
11
12
13
14
15
16
17
18
19
20
21
22
23
24
25
26
27
28
29
30
31
32
33
34
35
36
37
38
39
liumiaocn:sonar liumiao$ cat docker-compose.6.7.yml 
version: '2'

services:
# database service: mysql
mysql:
image: liumiaocn/mysql:5.7.16
ports:
- "3306:3306"
volumes:
- ./mysql/data/:/var/lib/mysql
- ./mysql/conf.d/:/etc/mysql/conf.d
environment:
- MYSQL_ROOT_PASSWORD=hello123
- MYSQL_DATABASE=sonarqube
restart: "no"


# Security service: sonarqube
sonarqube:
image: liumiaocn/sonarqube:6.7.1
ports:
- "9000:9000"
volumes:
- ./sonar/data/:/opt/sonarqube/data
- ./sonar/log/:/opt/sonarqube/log
- ./sonar/extensions/:/opt/sonarqube/extensions
- ./sonar/conf/:/opt/sonarqube/conf
environment:
- SONARQUBE_JDBC_USERNAME=root
- SONARQUBE_JDBC_PASSWORD=hello123
- SONARQUBE_JDBC_URL=jdbc:mysql://mysql:3306/sonarqube?useUnicode=true&characterEncoding=utf8&rewriteBatchedStatements=true&useConfigs=maxPerformance
links:
- mysql:mysql
depends_on:
- mysql
restart: "no"
liumiaocn:sonar liumiao$
1234567891011121314151617181920212223242526272829303132333435363738

启动服务

1
2
3
4
5
liumiaocn:sonar liumiao$ docker-compose -f docker-compose.6.7.yml up -d
Creating sonar_mysql_1 ... done
Creating sonar_sonarqube_1 ... done
liumiaocn:sonar liumiao$
1234

结果确认

docker容器启动之后,可以使用docker-compose ps命令确认服务运行状态

1
2
3
4
5
6
7
liumiaocn:sonar liumiao$ docker-compose -f docker-compose.6.7.yml ps
Name Command State Ports
--------------------------------------------------------------------------------
sonar_mysql_1 docker-entrypoint.sh mysqld Up 0.0.0.0:3306->3306/tcp
sonar_sonarqube_1 ./bin/run.sh Up 0.0.0.0:9000->9000/tcp
liumiaocn:sonar liumiao$
123456

在这里插入图片描述
在这里插入图片描述

使用示例

使用示例可参看:
Angular应用中使用SonarQube进行质量扫描

$ pwd
/root/workspace/apache-zookeeper-3.6.2-bin/bin

$ /bin/bash ./zkCli.sh -timeout 5000 -server 10.4.154.137:2181

1
2
3
4
#docker 启动服务命令
docker run -d -e TZ="Asia/Shanghai" -p 8080:2181 -v $PWD/data:/data --name zookeeper --restart always zookeeper
#docker client 启动 zookeeper 测试
docker run -it --rm --link zookeeper:zookeeper zookeeper zkCli.sh -server zookeeper

zkCli.sh的使用

ZooKeeper服务器简历客户端

./zkCli.sh -timeout 0 -r -server ip:port

./zkCli.sh -timeout 5000 -server 192.9.200.242:2181

-r :即使ZooKeeper服务器集群一般以上的服务器当掉,也给客户端体统读服务

img

h 显示所有命令

img

img

ls path:查看某个节点下的所有子节点信息

ls / :列出根节点下所有的子节点信息

img

stat path :获取指定节点的状态信息

状态信息分析:

img

czxid 创建该节点的事物ID

ctime 创建该节点的时间

mZxid 更新该节点的事物ID

mtime 更新该节点的时间

pZxid 操作当前节点的子节点列表的事物ID(这种操作包含增加子节点,删除子节点)

cversion 当前节点的子节点版本号

dataVersion 当前节点的数据版本号

aclVersion 当前节点的acl权限版本号

ephemeralowner 当前节点的如果是临时节点,该属性是临时节点的事物ID

dataLength 当前节点的d的数据长度

numchildren 当前节点的子节点个数

get path 获取当前节点的数据内容

img

ls2 path :是ls 和 stat两个命令的结合

img

create [-s] [-e] path data acl

-s 表示是顺序节点

-e 标识是临时节点

path 节点路径

data 节点数据

acl 节点权限

img

注:临时节点在客户端结束与服务器的会话后,自动消失

quit :退出客户端

set path data [version] :修改当前节点的数据内容 如果指定版本,需要和当前节点的数据版本一致

img

delete path [version] 删除指定路径的节点 如果有子节点要先删除子节点

img

rmr path 删除当前路径节点及其所有子节点

img

setquota -n|-b val path 设置节点配额(比如限制节点数据长度,限制节点中子节点个数)

-n 是限制子节点个数 -b是限制节点数据长度

超出配额后,ZooKeeper不会报错,而是在日志信息中记录

tail zookeeper.out

img

img

listquota path 查看路径节点的配额信息

img

delquota [-n|-b] path 删除节点路径的配额信息

img

connect host:port 和 clost

在当前连接中连接其他的ZooKeeper服务器和关闭服务器

img

history 和 redo cmdno :查看客户端这次会话所执行的所有命令 和 执行指定历史命令

img

简介

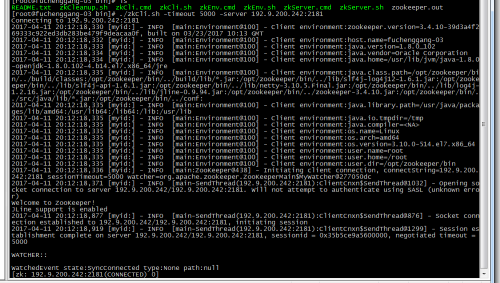
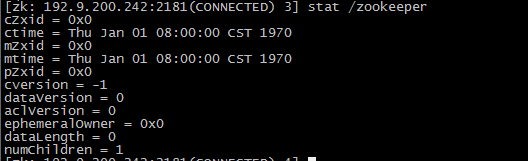
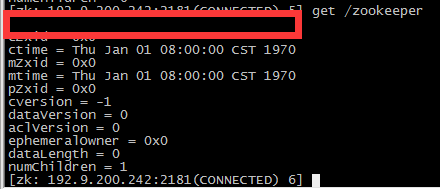
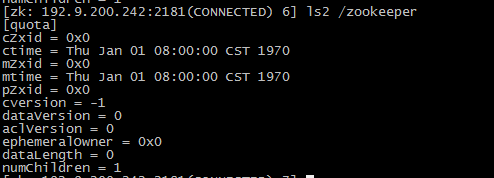
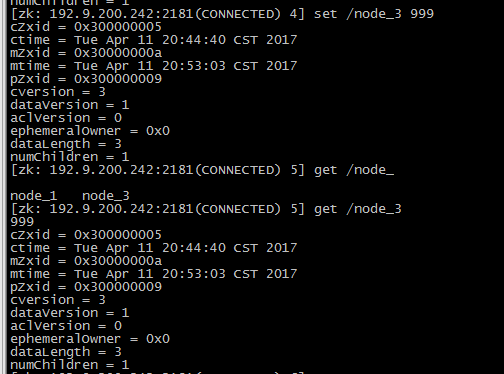
Curator是Netflix公司开源的一套zookeeper客户端框架,解决了很多Zookeeper客户端非常底层的细节开发工作,包括连接重连、反复注册Watcher和NodeExistsException异常等等。Patrixck Hunt(Zookeeper)以一句“Guava is to Java that Curator to Zookeeper”给Curator予高度评价。
引子和趣闻:
Zookeeper名字的由来是比较有趣的,下面的片段摘抄自《从PAXOS到ZOOKEEPER分布式一致性原理与实践》一书:
Zookeeper最早起源于雅虎的研究院的一个研究小组。在当时,研究人员发现,在雅虎内部很多大型的系统需要依赖一个类似的系统进行分布式协调,但是这些系统往往存在分布式单点问题。所以雅虎的开发人员就试图开发一个通用的无单点问题的分布式协调框架。在立项初期,考虑到很多项目都是用动物的名字来命名的(例如著名的Pig项目),雅虎的工程师希望给这个项目也取一个动物的名字。时任研究院的首席科学家Raghu Ramakrishnan开玩笑说:再这样下去,我们这儿就变成动物园了。此话一出,大家纷纷表示就叫动物园管理员吧——因为各个以动物命名的分布式组件放在一起,雅虎的整个分布式系统看上去就像一个大型的动物园了,而Zookeeper正好用来进行分布式环境的协调——于是,Zookeeper的名字由此诞生了。

Curator无疑是Zookeeper客户端中的瑞士军刀,它译作”馆长”或者’’管理者’’,不知道是不是开发小组有意而为之,笔者猜测有可能这样命名的原因是说明Curator就是Zookeeper的馆长(脑洞有点大:Curator就是动物园的园长)。
Curator包含了几个包:
curator-framework:对zookeeper的底层api的一些封装
curator-client:提供一些客户端的操作,例如重试策略等
curator-recipes:封装了一些高级特性,如:Cache事件监听、选举、分布式锁、分布式计数器、分布式Barrier等
Maven依赖(使用curator的版本:2.12.0,对应Zookeeper的版本为:3.4.x,如果跨版本会有兼容性问题,很有可能导致节点操作失败):

1
2
3
4
5
6
7
8
9
10
<dependency>
<groupId>org.apache.curator</groupId>
<artifactId>curator-framework</artifactId>
<version>2.12.0</version>
</dependency>
<dependency>
<groupId>org.apache.curator</groupId>
<artifactId>curator-recipes</artifactId>
<version>2.12.0</version>
</dependency>

Curator的基本Api

创建会话

1.使用静态工程方法创建客户端

一个例子如下:

1
2
3
4
5
6
7
RetryPolicy retryPolicy = new ExponentialBackoffRetry(1000, 3);
CuratorFramework client =
CuratorFrameworkFactory.newClient(
connectionInfo,
5000,
3000,
retryPolicy);

newClient静态工厂方法包含四个主要参数:

参数名 说明
connectionString 服务器列表,格式host1:port1,host2:port2,…
retryPolicy 重试策略,内建有四种重试策略,也可以自行实现RetryPolicy接口
sessionTimeoutMs 会话超时时间,单位毫秒,默认60000ms
connectionTimeoutMs 连接创建超时时间,单位毫秒,默认60000ms

2.使用Fluent风格的Api创建会话

核心参数变为流式设置,一个列子如下:

1
2
3
4
5
6
7
8
RetryPolicy retryPolicy = new ExponentialBackoffRetry(1000, 3);
CuratorFramework client =
CuratorFrameworkFactory.builder()
.connectString(connectionInfo)
.sessionTimeoutMs(5000)
.connectionTimeoutMs(5000)
.retryPolicy(retryPolicy)
.build();

3.创建包含隔离命名空间的会话

为了实现不同的Zookeeper业务之间的隔离,需要为每个业务分配一个独立的命名空间(NameSpace),即指定一个Zookeeper的根路径(官方术语:***为Zookeeper添加“Chroot”特性***)。例如(下面的例子)当客户端指定了独立命名空间为“/base”,那么该客户端对Zookeeper上的数据节点的操作都是基于该目录进行的。通过设置Chroot可以将客户端应用与Zookeeper服务端的一课子树相对应,在多个应用共用一个Zookeeper集群的场景下,这对于实现不同应用之间的相互隔离十分有意义。

1
2
3
4
5
6
7
8
9
RetryPolicy retryPolicy = new ExponentialBackoffRetry(1000, 3);
CuratorFramework client =
CuratorFrameworkFactory.builder()
.connectString(connectionInfo)
.sessionTimeoutMs(5000)
.connectionTimeoutMs(5000)
.retryPolicy(retryPolicy)
.namespace("base")
.build();

启动客户端

当创建会话成功,得到client的实例然后可以直接调用其start( )方法:

1
client.start();

数据节点操作

创建数据节点

Zookeeper的节点创建模式:

  • PERSISTENT:持久化
  • PERSISTENT_SEQUENTIAL:持久化并且带序列号
  • EPHEMERAL:临时
  • EPHEMERAL_SEQUENTIAL:临时并且带序列号

**创建一个节点,初始内容为空 **

1
client.create().forPath("path");

注意:如果没有设置节点属性,节点创建模式默认为持久化节点,内容默认为空

创建一个节点,附带初始化内容

1
client.create().forPath("path","init".getBytes());

创建一个节点,指定创建模式(临时节点),内容为空

1
client.create().withMode(CreateMode.EPHEMERAL).forPath("path");

创建一个节点,指定创建模式(临时节点),附带初始化内容

1
client.create().withMode(CreateMode.EPHEMERAL).forPath("path","init".getBytes());

创建一个节点,指定创建模式(临时节点),附带初始化内容,并且自动递归创建父节点

1
2
3
4
client.create()
.creatingParentContainersIfNeeded()
.withMode(CreateMode.EPHEMERAL)
.forPath("path","init".getBytes());

这个creatingParentContainersIfNeeded()接口非常有用,因为一般情况开发人员在创建一个子节点必须判断它的父节点是否存在,如果不存在直接创建会抛出NoNodeException,使用creatingParentContainersIfNeeded()之后Curator能够自动递归创建所有所需的父节点。

删除数据节点

删除一个节点

1
client.delete().forPath("path");

注意,此方法只能删除叶子节点,否则会抛出异常。

删除一个节点,并且递归删除其所有的子节点

1
client.delete().deletingChildrenIfNeeded().forPath("path");

删除一个节点,强制指定版本进行删除

1
client.delete().withVersion(10086).forPath("path");

删除一个节点,强制保证删除

1
client.delete().guaranteed().forPath("path");

guaranteed()接口是一个保障措施,只要客户端会话有效,那么Curator会在后台持续进行删除操作,直到删除节点成功。

注意:上面的多个流式接口是可以自由组合的,例如:

1
client.delete().guaranteed().deletingChildrenIfNeeded().withVersion(10086).forPath("path");

读取数据节点数据

读取一个节点的数据内容

1
client.getData().forPath("path");

注意,此方法返的返回值是byte[ ];

读取一个节点的数据内容,同时获取到该节点的stat

1
2
Stat stat = new Stat();
client.getData().storingStatIn(stat).forPath("path");

更新数据节点数据

更新一个节点的数据内容

1
client.setData().forPath("path","data".getBytes());

注意:该接口会返回一个Stat实例

更新一个节点的数据内容,强制指定版本进行更新

1
client.setData().withVersion(10086).forPath("path","data".getBytes());

检查节点是否存在

1
client.checkExists().forPath("path");

注意:该方法返回一个Stat实例,用于检查ZNode是否存在的操作. 可以调用额外的方法(监控或者后台处理)并在最后调用forPath( )指定要操作的ZNode

获取某个节点的所有子节点路径

1
client.getChildren().forPath("path");

注意:该方法的返回值为List,获得ZNode的子节点Path列表。 可以调用额外的方法(监控、后台处理或者获取状态watch, background or get stat) 并在最后调用forPath()指定要操作的父ZNode

事务

CuratorFramework的实例包含inTransaction( )接口方法,调用此方法开启一个ZooKeeper事务. 可以复合create, setData, check, and/or delete 等操作然后调用commit()作为一个原子操作提交。一个例子如下:

1
2
3
4
5
6
7
client.inTransaction().check().forPath("path")
.and()
.create().withMode(CreateMode.EPHEMERAL).forPath("path","data".getBytes())
.and()
.setData().withVersion(10086).forPath("path","data2".getBytes())
.and()
.commit();

异步接口

上面提到的创建、删除、更新、读取等方法都是同步的,Curator提供异步接口,引入了BackgroundCallback接口用于处理异步接口调用之后服务端返回的结果信息。BackgroundCallback接口中一个重要的回调值为CuratorEvent,里面包含事件类型、响应吗和节点的详细信息。

CuratorEventType

事件类型 对应CuratorFramework实例的方法
CREATE #create()
DELETE #delete()
EXISTS #checkExists()
GET_DATA #getData()
SET_DATA #setData()
CHILDREN #getChildren()
SYNC #sync(String,Object)
GET_ACL #getACL()
SET_ACL #setACL()
WATCHED #Watcher(Watcher)
CLOSING #close()

响应码(#getResultCode())

响应码 意义
0 OK,即调用成功
-4 ConnectionLoss,即客户端与服务端断开连接
-110 NodeExists,即节点已经存在
-112 SessionExpired,即会话过期

一个异步创建节点的例子如下:

1
2
3
4
5
6
7
Executor executor = Executors.newFixedThreadPool(2);
client.create()
.creatingParentsIfNeeded()
.withMode(CreateMode.EPHEMERAL)
.inBackground((curatorFramework, curatorEvent) -> { System.out.println(String.format("eventType:%s,resultCode:%s",curatorEvent.getType(),curatorEvent.getResultCode()));
},executor)
.forPath("path");

注意:如果#inBackground()方法不指定executor,那么会默认使用Curator的EventThread去进行异步处理。

Curator食谱(高级特性)

提醒:首先你必须添加curator-recipes依赖,下文仅仅对recipes一些特性的使用进行解释和举例,不打算进行源码级别的探讨

1
2
3
4
5
<dependency>
<groupId>org.apache.curator</groupId>
<artifactId>curator-recipes</artifactId>
<version>2.12.0</version>
</dependency>

重要提醒:强烈推荐使用ConnectionStateListener监控连接的状态,当连接状态为LOST,curator-recipes下的所有Api将会失效或者过期,尽管后面所有的例子都没有使用到ConnectionStateListener。

缓存

Zookeeper原生支持通过注册Watcher来进行事件监听,但是开发者需要反复注册(Watcher只能单次注册单次使用)。Cache是Curator中对事件监听的包装,可以看作是对事件监听的本地缓存视图,能够自动为开发者处理反复注册监听。Curator提供了三种Watcher(Cache)来监听结点的变化。

Path Cache

Path Cache用来监控一个ZNode的子节点. 当一个子节点增加, 更新,删除时, Path Cache会改变它的状态, 会包含最新的子节点, 子节点的数据和状态,而状态的更变将通过PathChildrenCacheListener通知。

实际使用时会涉及到四个类:

  • PathChildrenCache
  • PathChildrenCacheEvent
  • PathChildrenCacheListener
  • ChildData

通过下面的构造函数创建Path Cache:

1
public PathChildrenCache(CuratorFramework client, String path, boolean cacheData)

想使用cache,必须调用它的start方法,使用完后调用close方法。 可以设置StartMode来实现启动的模式